Ad Hoc Nodes
Definition: ad hoc (from Latin, meaning “for this”): Formed, arranged, or done for a particular purpose only.
OSP staff can modify the approval flow by adding an ad hoc reviewer. These manually added reviewers can be for a particular role or a specific person.
Rules for OSP staff adding ad hoc nodes
If you add an ad hoc node, you must add it “before” the “OSP Approver” node. For example, OSP staff who do not have signing authority to submit proposals can add their manager “ad hoc” to let the manager know that they have reviewed the eGC1, and it is ready for manager approval prior to submission.
On the approval flow, there are three Graph Options you can use:
- Add Comment – used to add a comment to the History & Comments page
- Add Approver – used to add an ad hoc approver to the graph; opens the Add Approver dialog
- Add Watcher – used to add an ad hoc watcher to the graph; opens the Add Watcher dialog
The dialog for adding both approvers and watchers has the same options. The following image shows the Add Approver dialog.
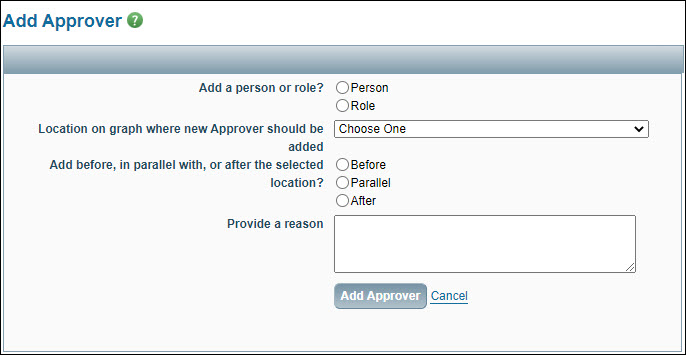
First, select whether the node will be for a Role or just one Person, and fill in the related details.
- If you choose Person, a Look Up Person button will display. Click it to search for and select the individual.
- If you choose Role, a drop-down menu will appear from which you can select the desired reviewer role.
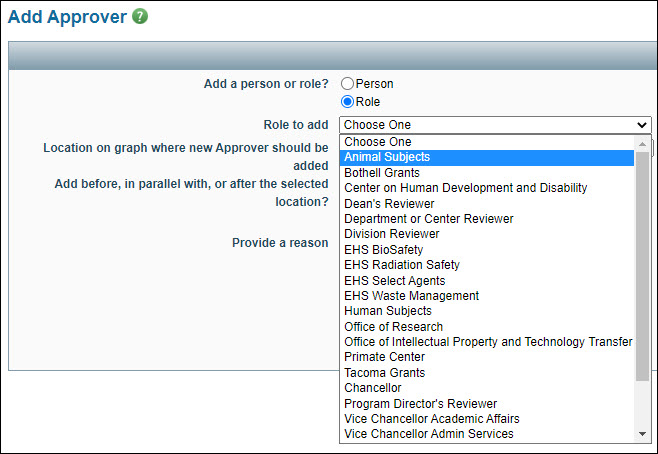
If the role you choose is limited by organization code, a Look Up Organizational Code button will appear. Use it to pick the org code at the corresponding level (dept, div, dean).
Next, choose where on the graph the node will appear. This is a two-step process.
- The “Location on graph… ” drop-down menu lists all of the nodes currently on the graph. Pick the one you want the ad hoc node to be next to.
- Then choose if the ad hoc node will be before, parallel with, or after the selected node.
Finally, provide a reason for why you are adding this ad hoc reviewer. This is a required field. Click the “Add Approver” button to complete the process.
This is an example portion of the graph for an In OSP status application, before adding the ad hoc node.

The following images show the pop-up screen with options selected.

The next image shows the resulting graph with the new ad hoc Approver added “before” the OSP node, as seen by the person who added it. Note the “Delete” option. The person who adds the ad hoc node is the only one who can delete it.

When other reviewers see the node for the ad hoc reviewer it will indicate who added it.
