Personalize Your Tasklist Display
You can use the Tasklist Options to personalize the display of your tasklists.
You can click anywhere on the bar to open or close the Tasklist Options section. When open, the title of the bar changes to Hide Tasklist Options. When closed, some of your options choices will display following the Tasklist Options heading.
The tasklist options section enables you to:
- Filter the tasklist to display only those items that match specific characteristics.
- Sort the tasklist to display items in an order other than by item ID, highest to lowest.
- Adjust the tasklist columns to display the ones you need, in a particular order.
The following image shows all of the Tasklist Options for Applications, except Available Columns which is described in the tasklist columns section below. The tasklists for other item types have similar option choices. The options are described from left to right, top to bottom.
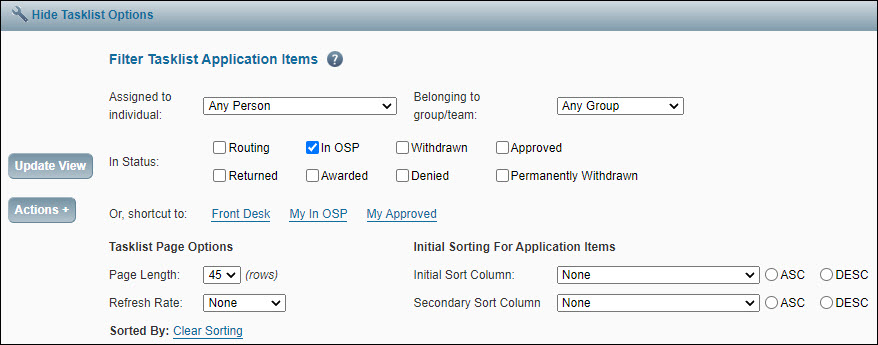
There are two buttons on the far left, Update View, and below it, Actions +.
- Select Update View to re-display the tasklist using the options you have selected. This will temporarily save the new view until you refresh the view, log out of SPAERC or close your browser window.
- To permanently save a new tasklist view, use the Actions + button.
- To refresh the view to the currently saved setting, select the Refresh icon located to the left of the Applications tab. It’s two arrows forming a circular shape.
- Select Actions + to see the following menu choices.
- Set As Default Tasklist: select this to make your currently displayed tasklist the one you see each time you log in to SPAERC. It won’t matter whether you change the view of the tasklist you have selected as your Default Tasklist; it will always be the tasklist that displays when you first log into SPAERC, unless you select another Default Tasklist.
- Save Tasklist Settings: select this to save your personalized view of the tasklist. Each time you return to this tasklist, these settings will be in effect. You can change the view of your tasklist temporarily by using the Update View button. The system will default to your saved tasklist view when you log into SPAERC at a later time or refresh the view.
- Create Custom Tasklist: you have the option to create your own unique, custom tasklist. You can add links to a mix of item types onto this tasklist. See Create a Custom Tasklist for details.
Filter the Tasklist
You can filter the items on a tasklist by assignment and/or status.
Filter by Individual and/or team assignment
- Use the Assigned to Individual drop-down menu to select the name of the person whose items you want to see.
- If you want to see items assigned to a team, use the Belonging to group/team drop-down menu, and select the team.
- Select Update View from the Actions + menu to display only those items that match your selections.
Note: If you select an individual and a team, SPAERC will display only those items assigned to both that individual and that team. If the individual is not part of the team you select, no items will display.
Filter by Status
- Select one or more In Status check boxes.
- On the Subawards tasklist, you can filter by the status of both the Subawards (SC) and the Subaward Actions (SA).
- Select Update View from the Actions + menu to display only those items that match your selections.
Note: the status options are different depending on which tasklist you are viewing. The Cycles Tasklist does not include this option because a Cycle does not have a status. It typically contains multiple items, and each item may have a different status.
On the Applications Tasklist, there are also three predefined filters available following the Or, shortcut to label:
- Front Desk displays Applications with a status of Routing assigned to “Any Person” and belonging to “Any Group”.
- My In OSP displays Applications assigned to you with a status of In OSP.
- My Approved displays Applications assigned to you with a status of Approved.
Sort the Tasklist
You have two options for changing or sorting the order in which items display on your tasklist. You can:
- Click a column heading on your tasklist. For example, click Sponsor Name to sort your tasklist items alphabetically by sponsor name. The first click will sort the list in reverse order (Z to A). Clicking the same column heading a second time will sort A to Z.
- Select an item from the Initial Sort Column drop down menu under Initial Sorting for … Items in the Tasklist Options section.
The sort order you select will display following the Sorted By heading at the bottom of your Tasklist Options. It also displays on the Tasklist Options bar when the options is closed.
IMPORTANT: Sorting is cumulative in SPAERC. In other words, choosing a second column to sort by will sort the items within the initial sort. For example, if you sort by Sponsor, and then by Status, you will see all items grouped by Sponsor, and then for a given Sponsor, by status.
To set a sort order from the Tasklist Options
- Under Initial Sorting For … Items, select your desired column from the drop-down list. The list displays all columns regardless of whether those columns currently display on your tasklist.
- Select the ASC radio button to sort items in ascending order (A-Z, 0-9), or DESC to sort items in descending order (Z-A, 9-0).
- If you want to establish a secondary sort order, select a column from the Secondary Sort Column drop-down menu, and select ASC or DESC radio button.
To remove any existing sorting, select the Clear Sorting link following the Sorted By label in the Tasklist Options section.
Adjust the Tasklist Columns
To select the data columns and adjust the order of information that displays for each item on your tasklists, use the Available Columns option.
This section appears to the far right of the other tasklist options. You may need to scroll right to see it.
There are two lists: Available and Chosen. Any column that you include in the Chosen list displays in the tasklist. Any column in the Available list does not display. The Item ID column is not listed, as it always displays as the first (left-most) column and cannot be moved.
Each tasklist includes different column options. For detailed information on the column options for each Tasklist, see the specific columns articles for each item type. The following image shows the section for the Applications tasklist.

To display a column
- Select a column to display from the Available list. If you want to select more than one column, hold down the Ctrl key on your keyboard, and then click the additional column names you want.
- Click the double-arrow pointing to the right (>>) button to move your selection to the Chosen list.
- Select Update View from the Actions + menu to see the selections on the tasklist.
To hide a column
- Select a column from the Chosen list. If you want to remove more than one column, hold down the Ctrl key on your keyboard, and click the additional column names you want.
- Click the double-arrow pointing to the left (<<) button to move the columns to the Available list.
- Select Update View from the Actions + menu to see the selections on the tasklist.
To change the order in which columns display
- Select one column from the Chosen list. Note: You can only move one column at a time.
- When you select a column, the Up and Down buttons are enabled.
- If you want to move the column toward the left on your tasklist (closer to the item ID), click Up. If you want to move the column toward the right (farther from the item ID), click Down.
- Select Update View from the Actions + menu to see the selections on the tasklist.
Tip: To display all columns for an item, click the All>> button between the Available and Chosen lists. To hide all columns except the item ID column, click the <<All button.