Budget Salary and Benefit Costs
Use this section of your worksheet to add personnel costs. This article describes the following:
Section Layout
Each person added is a row in the table for this section. The last row is the Salary & Benefit Costs Total which displays the calculated total for each period and the All Periods column.
Note: Award requirement: Workday requires one Project Role of Principal Investigator with or without a Percent Effort even if there is a secondary PI (Application PI, Multiple PI, or Co-Investigator.)
This requirement applies to the Primary, Internal, and Fabrication worksheets.
The following image shows an example of this section:
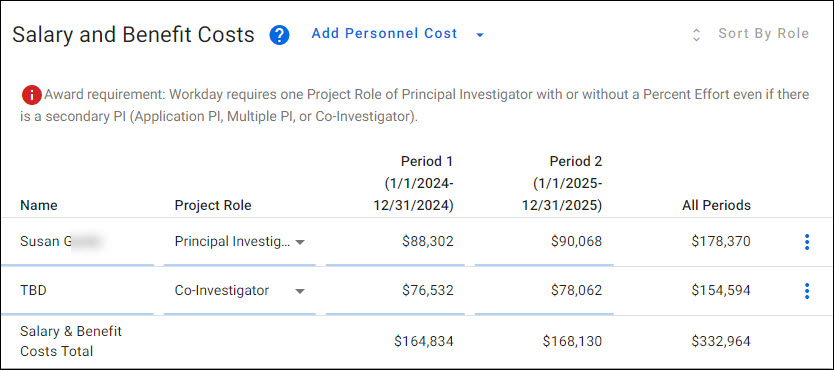
The column headings for personnel are:
- Name
- Project Role
- Period description, with the period dates
- All Periods
Adding Personnel
You can add either UW Personnel or Placeholder (TBD – to be determined) personnel to your budget. Placeholder (TBD) personnel can be used, for example, to add some personnel roles to your budget when you do not yet know specifically who the person will be.
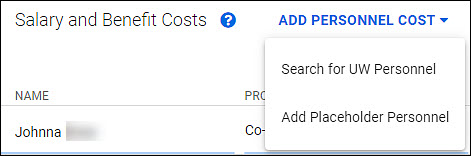
To add personnel, click on the Add Personnel Cost drop-down menu to the right of the section title. Then select either Search for UW Personnel or Add Placeholder Personnel. The following image shows the expanded drop-down menu.
Adding UW Personnel
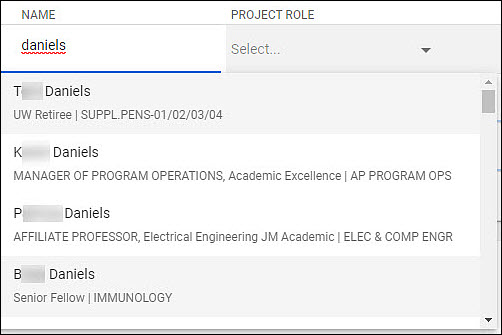
When you select Search for UW Personnel, the system adds a row at the top of this section, and puts the cursor in the Name field. As indicated by the hint text, you can search by name or NetID. As you type in characters, the system will start displaying matching results. As you add more characters, the results list will continue to update.
The results list shows the person’s first and last name, their title and department. From the results list, click on the person you want to add to your budget. Their first and last name will display in the Name field.
The following image shows an example of a search and results list.
Use the Project Role drop-down menu to indicate their relationship to the project. Choices are:
- Principal Investigator – only one personnel entry on a worksheet can have this role
- Application PI
- Multiple PI
- Mentor
- Co-Investigator
- Faculty
- Key Personnel
- Post Doctoral Associate
- Graduate Student
- Research Scientist
- Undergraduate Student
- Secretarial/Clerical
- Other
As you add personnel, each new person displays in the top row, so that the column headers are visible. A Sort by Role link displays above the All Periods column. When active, clicking it will rearrange the list of personnel to match the order in the drop-down. It will only be active when the list is not in order.
Adding Placeholder Personnel
When you select Add Placeholder Personnel, the system adds a row at the top of the section with TBD in the Name column. You can use the name side panel, described below, to adjust the name for a placeholder (TBD) entry. Use the drop-down menu in the Project Role column to indicate this person’s relationship to the project. You can use a TBD entry for the PI on subaward worksheets.
Personnel Details
There are two side panels with additional details for personnel. You can close either panel by clicking on the blue X to the right of the panel name, or by clicking somewhere outside of the panel.
Personnel Details Panel
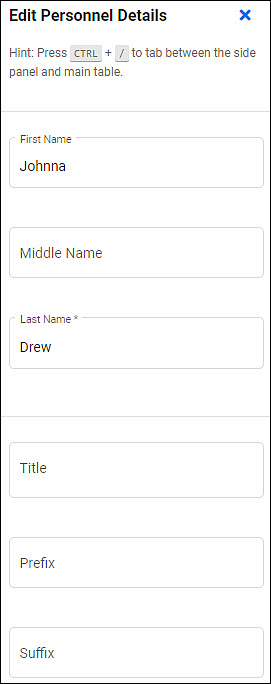
Access this panel by clicking in the Name field. For UW Personnel, it displays the person’s preferred name and title. You can edit the title and add an optional Prefix or Suffix.
For placeholder personnel, you can edit the First Name, Middle Name, and Last Name fields in addition to Title, Prefix, and Suffix. The following image shows the personnel details panel for a placeholder personnel.
Personnel Period Panel
Access this panel by clicking in a period field for an individual. It allows you to view and adjust salary, effort, and benefits details used to calculate the cost for this person.
The panel header includes:
- The period description
- The period total dollar amount, which is equal to the Total Requested Salary plus Total Benefits on Salary
- If Sea Pay is enabled, the total will also include the Total Sea Pay and Total Benefits on Sea Pay
- Information text indicating the current cascading state (on or off)
- The blue X, to the right of the period description, which will close the panel
The following image shows the panel header and salary area.
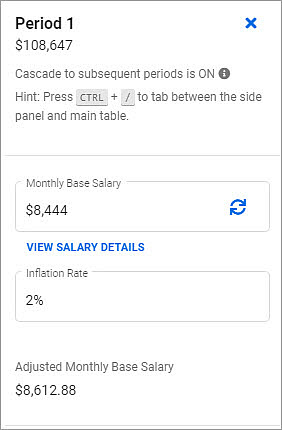
Salary Details
Monthly Base Salary
- For UW Personnel, this value comes from Workday. Below this field, there is a link to View Salary Details. When clicked, it opens a dialog showing additional details about the person’s compensation. The dialog is described below. Within the field is a Refresh icon (two curved arrows). Clicking this will open a confirmation dialog stating “Refreshing this salary will replace the current salary with the most up-to-date value for person’s name. Custom allocations you have added will be overridden.” You can continue or cancel from the dialog.
- For Placeholder Personnel, the Monthly Base Salary is a default value of $0. Enter the appropriate amount for this period.
- For Hourly Wage Personnel, review the Adding Hourly Personnel article for step-by-step instructions.
Inflation Rate
- For a newly created budget and primary worksheet, the current default value is 2%.
- A newly created sub-budget worksheet will use the value from the Budget Settings.
Adjusted Monthly Base Salary
- This is a system calculated field.
- It is equal to the Monthly Base Salary adjusted for inflation.
View Salary Details
Clicking this link in the Period panel will open a dialog displaying the person’s Monthly Base Salary Details.
The person’s name and selected budget role are listed, along with their UW Monthly Salary and the date it was retrieved from the payroll system. A table includes one row for each allocation. The columns are:
- Sub-Object Code
- Position Title
- Cost Center
- Organization
- Compensation Plan
- Unallocated Rate
- Distribution Percentage
- Full-Time Rate
A detailed row in the column displays for each compensation plan amount and allocation combination. Some compensation plans have a single cost center allocation, some have many.
- If no allocation record exists for general salary or hourly plan, then the position’s FTE is used as the distribution percent and the position cost center is displayed.
- If allocation record(s) exist for general salary or hourly plan, then the allocation distribution percent and cost center are displayed.
- All allowance pay has a distribution percent of 100% (1.0).
- All stipend pay has a distribution percent of 100% (1.0) and the positions cost center is displayed.
Each table row has a check box to the far left, including the column heading row. By default, all allocation rows are checked with the exception of administrative and endowed supplements. You can adjust what allocations are included by using the check boxes. Unchecking the box on the header row clears all the boxes.
Note: Review more guidance on effort reporting in GIM 35 and Post Award Fiscal Compliance Guidance on Effort Compliance Topics.
Below the table there are three values:
- Selected Allocations Total
- UW Clinical Salary Total
- Starting Monthly Salary – the sum of the first two values
Effort Details
The following image show the panel effort area.
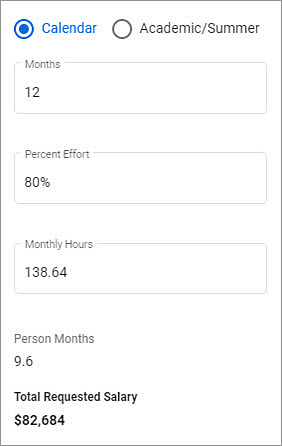
Calendar or Academic/Summer
- The default value is Calendar for all personnel.
- If you select Academic/Summer, two fields will display for effort values.
Months or Academic/Summer Months
- For calendar, the default value for Months is the length of the period
- For academic/summer, the default values are 75% and 25% of the length of the period, respectively. The fields are editable, so you can reduce these assumed values, if needed. You cannot exceed the default percent.
Percent Effort or Academic/Summer Percent Effort
- The default value is 0%.
- Enter the amount of effort for this person, and the system will calculate the Monthly Hours.
- The calculated value is equal to the Monthly Hours/ 173.3 * 100. There are 173.3 hours in a standard month.
Note: This field and the Monthly Hours field are connected. If you enter a value in one, the system will calculate the value for the other. This lets you choose which value you want to enter.
Monthly Hours or Academic/Summer Monthly Hours
- The default value is 0.
- Enter the number of hours for this person for this period to have the system calculate the Percent Effort.
- The calculated value is equal to the Percent Effort / 100 * 173.3 There are 173.3 hours in a standard month.
Person Months
- This is a system calculated field.
- The value is equal to the Percent Effort * Months
Total Requested Salary
- This is a system calculated field.
- The value is equal to the Adjusted Monthly Base Salary * Percent Effort
Note: review Budget Calculation Formulas for details on all calculations.
Benefits Details
The following image show the efforts area.
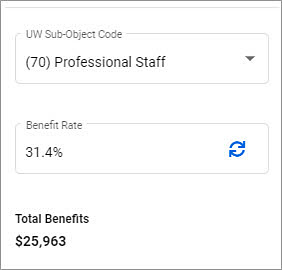
UW Sub-Object Code
- For UW Personnel, their sub-object code from Workday displays.
- For Placeholder Personnel, use the drop-down menu to select the appropriate sub-object code.
Note: for sub-object codes in the 30, 40, 50, or 90 range, the system will automatically add a tuition entry in the Other Costs section of your worksheet for the individual. See the Linked Tuition Entries section below for full details.
APL Benefit Rates Option
- If you enabled APL in the worksheet settings, two options will display: Standard Benefits and APL Benefits. By default, the Standard Benefits option is selected. To use the APL Benefits option, click on its tab.
- Two rate fields will display, APL Benefit Rate and APL Leave Rate, with the corresponding rates for the sub-object code selected. Both rates are editable.
- A link to Refresh Benefit & Leave Rates displays below the option tabs.
- Selecting the Standard Benefits tab will remove the APL fields and re-display the standard rate.
Benefit Rate
- The corresponding rate for the sub-object code selected displays.
- You can enter a different value, if needed.
- Within the field is a Refresh icon (two curved arrows). Clicking this will open a confirmation dialog stating “Refreshing the benefit rates will replace the current benefit rates with the most up-to-date values for person’s name.” You can continue or cancel from the dialog.
Total Benefits on Salary
- This is a calculated field.
- The value is equal to Total Requested Salary * Benefit Rate.
- If using APL benefits, the value is the sum of (APL Benefit Rate * Total Requested Salary) + (APL Leave Rate * Total Requested Salary).
Sea Pay
If you have enabled Sea Pay in the worksheet setting, additional sea pay fields will display below the Total Benefits on Salary amount, as shown in the following image.
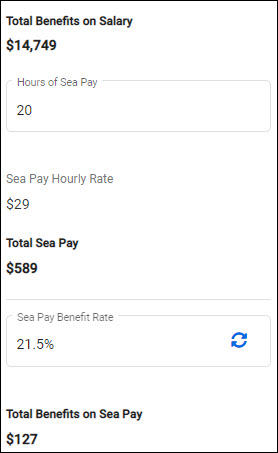
- Hours of Sea Pay – enter the hours for the period
- Sea Pay Hourly Rate – calculated amount equal to the Adjusted Monthly Base Salary divided by 173.3 (work hours in a standard month)
- Total Sea Pay – calculated amount equal to Hours of Sea Pay times Sea Pay Hourly Rate
- Sea Pay Benefit Rate – defaults to the rate for 01-86 Hourly personnel; if APL benefits are being used, this rate is the 01-86 Hourly APL benefit rate. You can edit this field. The field also includes a refresh link.
- Total Benefits on Sea Pay – calculated amount equal to Total Sea Pay times Sea Pay Benefit Rate
Note: review Budget Calculation Formulas for details on all calculations.
Cascading
To the right of the All Periods column is a “more actions” menu icon. The icon is 3 blue vertical dots. When you click on the icon, the menu displays.
It includes the choice the turn cascading on or off for this specific entry. When turned on, any values changed or entered in a period will cascade to future periods.
Deleting Personnel
Open the “more actions” menu icon to the right of the All Periods column. When you select “Delete Personnel” a confirmation dialog appears, stating “Are you sure you want to delete this cost? This action is permanent and cannot be reversed.” You can cancel or confirm the deletion of the personnel entry.
Adding Entry Notes
There are choices for managing notes on the “more actions” menu, which vary depending on the whether a note exists:
- Add Note – if none exists
- Edit Note – if there is an existing note
- Delete Note – if there is an existing note
When you select Add Note, a dialog will display with the person’s name and role. Use the text box for entering your note. Click Save to complete the process. You can also cancel out of the dialog, without saving a note. The following image shows the note dialog.

When a note is added, a “sheet of paper” icon will appear following the person’s name. Place your mouse over the icon to read the note.
If a note is present, the menu will include Edit Note and Delete Note. If you select Edit Note, the same dialog will appear. You can edit the current note, and then save the updated text. If you cancel, the original note remains.
If you select Delete Note, the note and note icon are both removed.
Linked Tuition Entries
When you add a personnel cost with a tuition-eligible sub-object code (30s, 40s, 50s, or 90s), the system will automatically add a linked tuition line item (08-05) to the Other Costs table, and a brief note to that effect will display.
A small gray oval with a university icon will display in the Name column for that personnel entry. When you hover your mouse over it, the text “This personnel cost has a linked tuition cost” will display. Correspondingly, the tuition entry will have a read-only description of “Tuition for first-name last-name” followed by a link icon. When you hover your mouse over the icon, the text “This tuition cost has a linked personnel cost” will display.
In the Personnel side panel, two additional items will display. A toggle switch to “Include linked tuition cost”, followed by an “Edit Period X Tuition” link button. The toggle switch is on by default. If you turn the toggle off, a confirmation warning will display. If you confirm the change, the linked tuition line will be deleted. The personnel line item icon will change to an orange warning icon, and the option to “Edit Period X Tuition Cost” will be removed from the side panel. Hovering over the orange icon will display the text “Personnel with this sub-object code usually have a linked tuition cost”.
When the toggle switch for “Include linked tuition cost” is off, the warning of “Personnel with this sub-object code usually have a linked tuition cost” will display below it. Switching it back on will re-create the linked tuition entry.
When you change the sub-object code for a personnel line to one that is tuition-ineligible, then a confirmation modal displays. It clarifies that the change will delete the linked tuition line item. When you confirm the change, the system updates the personnel sub-object code and deletes the tuition line item.
If you select “Edit Period X Tuition” in the personnel side panel, the system will redirect you to the tuition entry for that person, for that period, and its side panel will display.
In the linked Tuition side panel, selecting the “Edit Period X Salary & Benefits” link button will redirect you to the personnel entry for that person, for that period, and its side panel will display.
The “more options” icon at the right of a linked tuition line includes an option to delete the line item. Selecting it will display a confirmation modal, and continuing will delete the tuition line item. The formerly linked personnel line item remains.