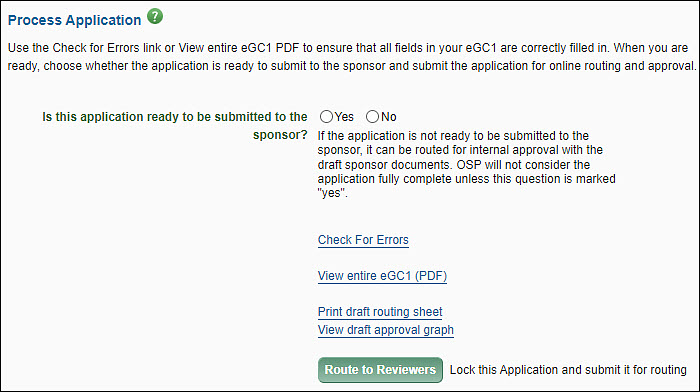
Process Application – Composing, Withdrawn, Returned Statuses
In this section, select Route to Reviewers to start it routing for approval. The system will run a validation check, the same one for the Check for Errors link. You will either see the pop-up window with an error list or the message that your application is locked for editing and starting the routing process.
You must correct all errors before you can complete the eGC1.

Is this application ready to be submitted to the sponsor?
Your response to this question lets OSP know if they can submit the attached sponsor documents. Answer No when routing the eGC1 with draft sponsor documents for internal UW approvals.
You must mark your eGC1 Yes for Ready to Submit by the deadline listed in GIM 19 Internal Deadlines for Proposals to External Entities.
For eGC1s which OSP will submit, if the answer is No, then OSP will not submit the application online. If the answer is Yes, then OSP will transmit these documents to the sponsor once they have completed their review process.
Each time you withdraw or a reviewer returns your eGC1, SAGE clears the answer to this question. You will have to re-answer it when you re-route the application. This is to help you to remember to move it from No to Yes at the appropriate time.
Note: You will not be able to route your eGC1 with Ready to Submit = Yes if any investigators have not completed their FIDS disclosure.
Check for Errors
Click this link to check that all required fields have values and all business rules in this eGC1 are correct. A list of errors displays in a separate window. As you correct errors on the eGC1, click Check for Errors again to see an updated Error List in the window. Once you have addressed all of the errors, select the Route to Reviewers button. See the Errors and Warning Summary article for more details.
View Entire Draft eGC1 (PDF)
Click this link to preview or print the entire eGC1. The printout will be labeled “DRAFT.”
Print Draft Routing Sheet
After you have entered the PI and the Cost Center Receiving Funding, you may click this button to preview or print the draft Routing Sheet. The printout will be labeled “DRAFT” so you must not use it for routing purposes.
If you have any paper documents to submit to campus reviewers, attach a copy of the final Routing Sheet to a copy of the application and provide it to each of the units that will review.
The content of the Routing Sheet will depend on the selections on the eGC1: department and dean for the PI, personnel, Cost Center Receiving Funding, and some compliance questions.
The Routing Sheet has two purposes:
- Provide a link between the paper documents and the online record.
- Provide a list of the units needing to approve this application. Use the checkboxes to denote which copy is for which unit (replacing the need to hand write the name of the unit on each copy for delivery).
View Draft Approval Graph
After you have entered the PI and the Cost Center Receiving Funding, you may click this button to view the Approval Flow. The flow content depends on the data in the eGC1 – department and dean for the PI, additional research personnel, the Cost Center Receiving Funding, and some compliance questions – as well as the rules for each organization involved with this project. If you modify the eGC1 data, the Approval Graph may change.
Route to Reviewers
Click the Route to Reviewers button to lock the eGC1 for routing. Only users with read/write permission on this application may complete it.
SAGE will check required fields and business rules in the entire eGC1. If there are any errors, a list displays in a separate window. After you correct the errors, return to this page and click Route to Reviewers.
After you successfully route the application, it becomes “locked for editing” and you cannot make any changes. You can then print the final version of the Routing Sheet and use it for routing any paper documents. The “draft” links will change to “final” links.
If you need to edit a routing eGC1, you must withdraw it or request it be returned. The Withdraw button will display at the top of the Certify & Route page after you route the eGC1.