SAGE-to-Workday Integrations
- Award Integration When an Advance Exists: When an Award Setup Request (ASR) is routed to GCA and an award in Advance Spend status already exists in Workday, SAGE now sends the remainder of the award setup data to Workday. This integration will reduce manual entry for GCA and expedite processing of new awards from an existing advance.
- Allow GCA to Select Award Lines to Integrate to Workday: When transitioning from an award in Advance Spent status to a fully setup award in Workday, GCA may now use the associated ASR to select which SAGE Budget worksheets should integrate as award lines in Workday. This prevents duplicate lines from being set up when multiple award lines already exist. When an award in Advance Spend status does not already exist, all award lines will be integrated by default.
Note: This feature is visible within SAGE Central for OSP and GCA only.
- Display Message for GCA for Award Setup Requests for Advance Spend Awards: When transitioning from an award with Advance Spend status to a fully setup award in Workday, the associated ASR now displays a message for GCA to indicate that an Advance exists and provides guidance on system behavior.
Award Setup Requests
- Display Workday Award Number in Header: When viewing an ASR in Processed status or one with an associated processed advance, users now see the Workday Award ID referenced in the header of the ASR.
- Display Workday Budget Totals by Object Class and Ledger: All ASR users can now see the object class, ledger names, and totals within the Budget and Lines section. This represents the amounts by object class that will be sent to Workday via integration to establish the Workday Award Plan.
- Customize View for Budget and Award Lines Section: All ASR users can now customize their Budget and Award Lines section to view or hide the object class/ledger or award line details for more concise viewing.
- Fix: Erroneous Validation Messages on Award Setup Requests: Budget-related validations in an ASR will now only show when specific SAGE Budget or award line data is missing or problematic. The validation message now clearly specifies when a budget is not connected to a request.
Advance Requests
- Advance Request Form Changes: Advance Request formatting has been adjusted to align with the design of the Award Setup and Modification Requests. This consistency improves the user experience and supports the future integration of Advance Requests. Key changes include:
- Request Form Header: When available, the Workday Award ID and the legacy (FIN) budget number now display in the header of the advance.
- Navigation: The right side panel of eGC1 information has been relocated to the General Information section of the left navigation.
- General Information Section: The following eGC1 fields now display in the General Information Section: short title, long title, Sponsored Program Activity type. A new subsection now provides RFA details from the eGC1 for GCA benefit. Additional help text has also been added to clarify alternative department worktag needs. These same fields display in the Review and Submit section and the Request Summary once the request has been submitted.
- Supporting Attachments Section: GCA can now add attachments to the Advance Request.
- GCA Team Assignments Moved to “More Options”: GCA can now assign advances in the same way as other requests, adding consistency to their views and processes.
- Renewal Advance Form Help Text Update: The General Information section of a renewal advance is now updated with help text to prompt users to add information related to the worktags in need of renewal.
Award Requests List
- Label Update for Filter by Principal Investigator: The “By Department/Center” header in the Filter Requests section now reads “By Principal Investigator.” This filter allows users to display all requests for a given PI. Searches can be refined by selecting additional status filters.
eGC1/Applications
- Fix: Applications Tasklist Sort in SAGE Central Not Working Properly: In SAGE Central, the Applications tasklist now properly returns sorted results when more than one sort level is specified.
- Fix: Personnel and Role Type Search Not Working Properly in SAGE eGC1 Tasklist: Searching by personnel lookup and role type in the SAGE eGC1 tasklist is now functioning as expected.
Use this section to provide information about human subject involvement and approvals for the project to help reviewers determine compliance with UW and sponsor requirements. Contact the Human Subjects Division with questions.
Note: Zipline data will be refreshed each time you view this page.
As with other eGC1 pages, you can partially complete your entries and save the eGC1. You must complete the required fields before you route your eGC1 for approval.
Select Start Section to open the section initially, and then Edit Section to add or update existing data.
Human Subjects Questions:
HS-1. Will the project involve interaction with Human Subjects, or identifiable data or specimens from human subjects?
Answer: Yes or No. An answer is required.
HS-1A displays if HS-1 = Yes
HS-1A. Delayed Onset: Will IRB application submission be delayed until after award because you will (1) identify and develop new protocols that will be supported by the award or (2) complete other research described in the proposal that is necessary before the human subjects research can be fully planned.
Answer: Yes or No
HS-1B displays if HS-1 = Yes
HS-1B. IRB Approval Pending: Will you need to submit a new IRB application, modify an existing IRB application, or are awaiting approval of a current IRB application for the human subject research in this project?
Answer: Yes or No
A table for IRB Application Details displays if HS-1 = Yes
Note: If HS-1 = Yes, and HS-1A = No (Delayed Onset), and HS-1B = No (IRB Approval Pending), then you must include at least one IRB application. See details below on how to add an IRB Application.
HS-1C displays if HS-1 = Yes AND Sponsored Program Activity Type (Details page) is “Clinical Trial – Federal Sponsors” or “Clinical Trial – Non-Federal Sponsors”
HS-1C. CRBB Involvement. Will the project involve use of UW Medicine clinical services or clinical space as a site of patient care, or include medical treatment of a patient by a UW Physicians provider?
Answer: Yes or No
CRBB (Clinical Research Budget & Billing) Note: If any of the following statements apply to this proposed work, mark Yes, even if the research involves only usual patient care items or the study budget will not be charged.
-
- Some of the proposed work will be conducted in a UW Medicine clinical setting. See CRBB Coverage Analysis Checklist, Section II, Sites of Practice, for a complete list of sites. Studies using Seattle Cancer Care Alliance locations should use the SRAMP access point when submitting to CRBB.
- The study involves one or more clinical procedures at one of these sites, such as use of a patient examination room, blood draws, imaging, clinical lab tests, administration of a research medication, or procedures.
- Payment of physician professional fees for clinical services from a UW-affiliated or Northwest Hospital physician is required, separate from the salaried research personnel effort reflected in the budget.
Contact CRBB at crbb@uw.edu or 206-543-7774 for assistance.
HS-2. Stem Cells. Will this research involve the use and/or creation of human embryonic stem cells?
Answer: Yes or No An answer is required.
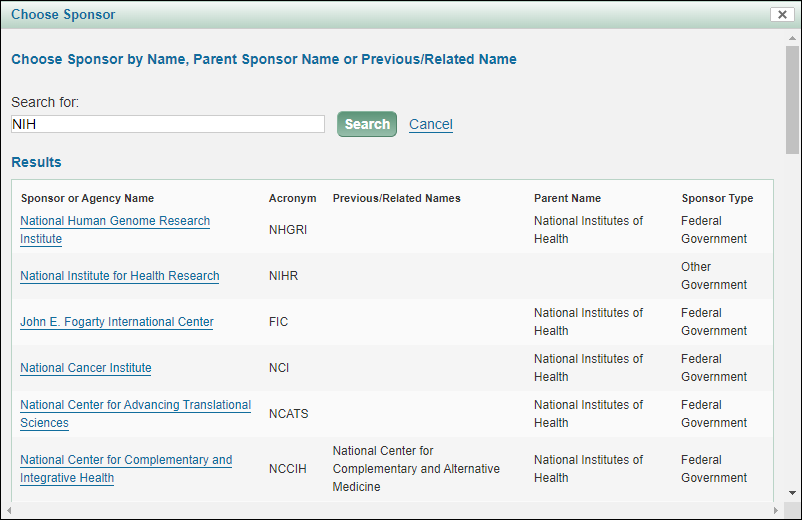
Add IRB Application
Start by selecting Add IRB Application. A dialog box will open where you can choose how you enter your data.
Search Zipline
You can use the blue “X” in the upper, right-hand corner to close the dialog and return to the Human Subjects section without saving any data.
The following image shows the initial dialog box.

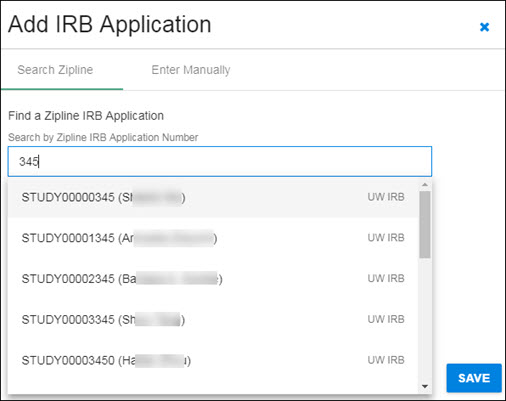
Enter all or part of the Zipline Application Number in the search box. The system will search for all applications that contain the entered numbers in the application number field. The results list will display below the search box, as shown in the following image.

Click on the appropriate study in the results list to select it. The study data will display in the dialog window, as shown in the following image.

Use the Save button in the lower, right-hand corner to add the study data, and return to the Human Subjects section.
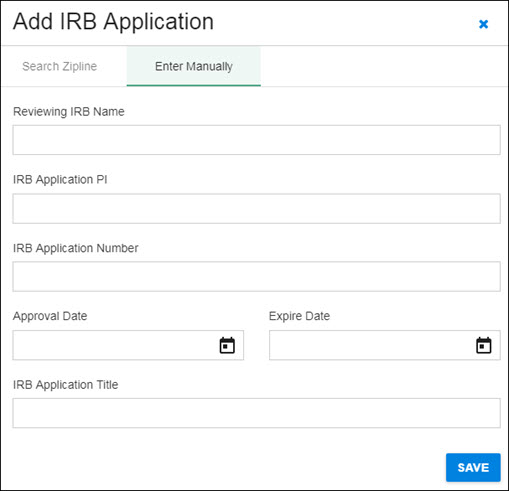
Enter Manually
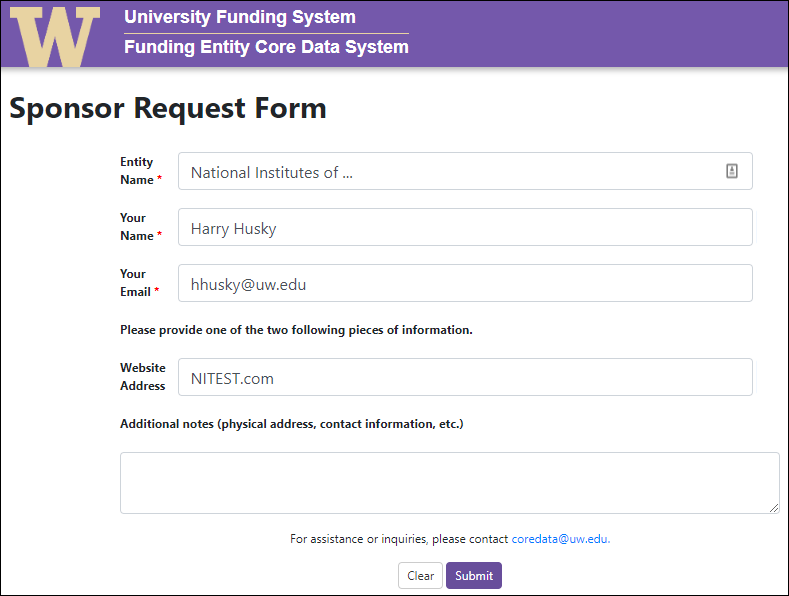
You have the option to add IRB Application information manually. Select Enter Manually in the dialog, then add the requested information.
- Reviewing IRB Name
- IRB Application PI
- Reviewing IRB Application Number
- Approval Date
- Expire Date
- IRB Application Title
Select Save to return to the Human Subjects section.
Note: All of the fields are required prior to eGC1 completion.
The following image shows the manual entry screen.

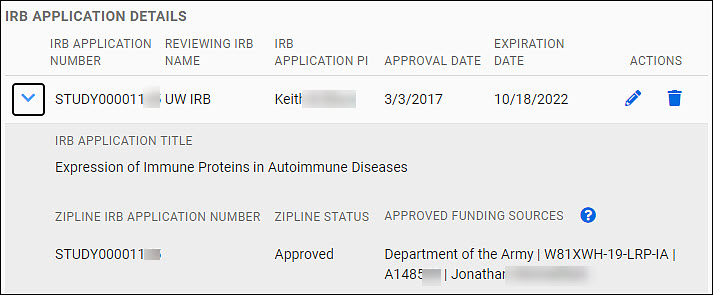
IRB Application Details section
Your data will appear as an expandable row of a table in the IRB Application Details section of the page.
The table row shows the follow data fields:
- IRB Application Number
- Reviewing IRB Name
- IRB Application PI
- Approval Date
- Expiration Date
You can edit or delete it using the icons (pencil, trash can) in the Actions column at the far right of the table row.
Use the chevron to the left of the row to expand the data shown. The additional data displayed includes:
- IRB Application Title
- Zipline Application Number
- Zipline Status
- Approved Funding Sources
The following image shows an expanded table entry.

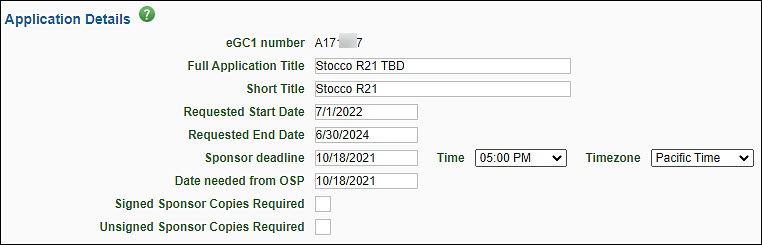
The Application Details section provides basic information for the Office of Sponsored Programs (OSP), Grant & Contract Accounting (GCA), and campus reviewers. The following image shows this section.

| Field |
Description |
| eGC1 Number |
A unique, system-generated number used to identify an eGC1 and application. It is used in OSP correspondence. |
| Full Application Title |
Enter the complete project title of the application. This title must match the title on the sponsor application. Refer to the sponsor’s instructions for the length permitted. Maximum of 255 characters. |
| Short Title |
Enter a short title (no more than 22 characters, usually assigned by the PI or department) to identify the project within the UW financial system. Upon award, this will be the name of the budget. |
| Requested Start and End Date |
Enter the anticipated beginning and ending dates of the project period. These dates must match the dates on the sponsor application. Specific dates should be used for Royalty Research Fund (RRF) Applications. |
| Sponsor Deadline |
Enter the last date the sponsor will accept the application or the date the application must be postmarked. Include the time of day and the corresponding time zone. See GIM 19: Internal Deadlines for Proposals to Outside Agencies to understand when OSP needs to have your application based on the sponsor’s deadline. Note: this is not required for NAA type applications. |
| Date Needed from OSP |
Use this optional field to enter the date that your department is requesting OSP’s approval process be complete. |
| Signed and Unsigned Sponsor Copies Required |
Optionally, enter a numeric value to indicate the number of signed copies and/or unsigned copies of the application required by the sponsor. Refer to the sponsor’s instructions for this information. |
The eGC1 status indicates where an eGC1 is in the overall creation and routing process. Each eGC1 has only one eGC1 status at a time.
The following image shows the status choices on the My eGC1s page, with Composing selected:

The eGC1 statuses are defined in the following table:
| Status |
Description |
| Composing |
Applications being filled in and not yet ready for routing. Anyone with read/write access to the eGC1 can delete it. |
| Routing |
Application which have been completed and are currently routing to campus approvers. |
| Withdrawn |
Applications which have been withdrawn by an owner, someone with the ASTRA Global Edit role, or someone with read/write assigned access. eGC1s in Withdrawn status have stopped routing, and anyone with read/write access to the eGC1 can edit it. The eGC1 will resume routing when it is recompleted. |
| Returned |
Applications which a reviewer (campus or OSP) has returned for modifications. eGC1s in the Returned status have stopped routing, and anyone with read/write access to the eGC1 can edit it. The eGC1 will resume routing when it is recompleted. |
| In OSP |
Applications which the PI and all required campus units have approved, and OSP received for review. |
| Approved |
Applications which OSP have approved. |
| Awarded |
Applications which the sponsor has awarded. This system will update the eGC1 from Approved to Awarded when the associated Award Setup Request is updated to Processed status. |
| Denied by Sponsor |
Applications which the sponsor has denied. SAGE users can change an application to Denied by Sponsor status if the sponsor is not the UW Royalty Research Fund (RRF), or if there is no child FA. OSP can also change an application to this status. |
| Permanently Withdrawn |
Applications which will not be submitted to the sponsor. SAGE users can change an application to Permanently Withdrawn if there is no child FA; OSP can also change an application to a status of Permanently Withdrawn. |
The diagram below shows the flow of an application through the various statuses:

SAGE – the System to Administer Grants Electronically – is the web-based system used by faculty, researchers, administrators and staff.
You can stay up-to-date on changes in SAGE (and FIDS) by subscribing to our Office of Research Information Services (ORIS) News.
The core SAGE system allows you to carry out several tasks:
- SAGE Budget helps you create an accurate budget for your grant proposal. It auto-populates data from the payroll and financial systems, helps you select proper rates, and calculates totals automatically.
- You can connect a budget to a standard or Grant Runner eGC1 to populate budget data.
- You will need to connect a budget to an Award Setup Request.
- eGC1 Forms are the electronic Grants and Contracts forms you use to route your grant proposal through the University’s internal compliance process.
- Grant Runner applications combine the eGC1 and sponsor forms for some NIH funding opportunities requiring SF424 R&R forms, including Modular, Detailed and Subaward Budgets. With the click of a button, OSP can electronically submit your application via Grants.gov to the sponsor.
- Approvals is the electronic routing engine that stages eGC1s, Advances, and Award Setup Requests for approval by associated departments, colleges, compliance offices, and the Office of Sponsored Programs.
- Advances creates an online request form for an advance budget number.
- Awards allows you to create Award Setup Requests and Modification Requests.
- Subawards submits a request for a new subaward or a modification of an existing one.
Campus research teams and related central offices use the SAGE Suite electronic research administration system to manage application proposals and related items.
-
- SAGE: System to Administer Grants Electronically – is used by campus researchers and administrators
- SAGE Central is used by both the Office of Sponsored Programs (OSP) and Grants and Contract Accounting (GCA)
In addition, FIDS: Financial Interest Disclosure System is used by researchers designated as investigators; it integrates with SAGE.
The following set of tables gives a high-level overview of who uses each of the different components, and describes the possible actions and the why and/or when.
SAGE: System to Administer Grants Electronically
WHO: Campus research administrators, Principal Investigators, campus reviewers, compliance reviewers
| ACTION |
WHY / WHEN |
| Create SAGE Budgets |
Centralizes data gathering for salaries, benefits, and F&A rates. It can be connected to an application, which automatically populates the eGC1 budget data on the Budget & Fiscal Compliance page. Any changes to the budget will update in real time when the eGC1 Budget & Fiscal Compliance page is viewed.
In addition, if your eGC1 is a Grant Runner application using the RR Detailed Budget form, your budget data will appear in the form.
When creating an Award Setup Request, you will need to connect a budget. |
| Create applications (standard or Grant Runner) |
Required for all sponsored research. The standard eGC1 pages of the application are, in effect, an approvals routing cover letter for the proposal. Only the UW uses the eGC1; it does not go to the sponsor.
A Grant Runner application includes, in addition to the standard eGC1 pages, the sponsor forms for NIH. OSP submits the application “system-to-system.” |
| Approve routing applications |
The Principal Investigator, Multiple-PI, Application PI, academic reviewers (division, department, dean) and compliance reviewers (human subjects, animal use, EH&S, etc.) view and approve the application. At each approval, SAGE captures a PDF snapshot of the application and attaches it to the eGC1’s Approvals History & Comments page. Copies of the attachments are also captured.
Administrators and reviewers have the option to return the application to the research team for changes. They can also add other reviewers (as individuals or a group) to the approval flow as needed. These are referred to as “ad hoc” reviewers (approvers or watchers). |
| Request an advance budget number for awards |
Used when a research proposal is being awarded by the sponsor, but the actual award has not yet arrived. It requests GCA to set up a budget account in the financial system so the research team can start spending the anticipated award money. The preparer completes the request in SAGE, then GCA processes it in SAGE Central. |
| Create Award Setup Requests and Modification Requests for awarded eGC1 applications |
Used when a research proposal has been awarded and the award has been received. A “new” Award Setup Request (ASR) is created. For an ongoing award, a Modification Request might be created. |
SAGE Central
WHO: Office of Sponsored Programs (OSP), Grant & Contract Accounting (GCA)
| ACTION |
WHY / WHEN |
| Review and approve eGC1 applications |
OSP reviews the information on the eGC1, such as the sponsor proposal information and compliance questions, after all campus reviewers have approved. |
| Process Award Setup Requests |
Received from campus for reviews and approvals. Forwards to GCA for integration into Workday, with Award budget number. As part of completing the Award Setup Request, the system sends a notification to the requesters. |
| Manage Actions |
Will manage existing items while transitioning to SAGE Central and Workday. |
| Process Advance Budget Number Requests |
Received from the research team, an advance allows the team to spend award money before the actual award arrives. GCA adds a budget number to the Advance and sets up that budget in the financial system. As part of completing the Advance, the system sends a notification to the requesters. |
FIDS: Financial Interest Disclosure System
WHO: Any research personnel designated as an “Investigator” on the PI, Personnel, & Organizations page of the eGC1.
| ACTION |
WHY / WHEN |
| Create a Financial Interest Disclosure for an eGC1
or
A disclosure for a CoMotion tech transfer agreement or IRB approval
or
Complete an Annual Update disclosure |
Investigators are required to disclose any significant financial interests (SFI) such as salary, equity, sponsored travel, etc., that might, or might appear to, bias their research.
An investigator must complete a disclosure for each eGC1, whether or not there are SFI that apply, before the proposal can be marked as Ready-to-Submit = Yes.
The disclosures are reviewed by the SFI Reviewer, in the central Office of Research, who determines if there is a potential for a Financial Conflict of Interest (FCOI). The review occurs at the time of award (just-in-time).
Annual Updates: All investigators are required to review and update their SFI at least once a year. The “year” is calculated from the date of the last disclosure created in FIDS. Investigators are notified by email 45 days prior, and again at 15 days prior, to the end of that year’s time.
Full details on using FIDS can be found in its User Guide.
Note: only a UW NetID is needed to access FIDS. |
For RRF grant applications, the “Dates Requested” should be given standard values based on which round you are applying.
Fall Round
- Begin Date should be January 15 of next year.
- End Date should be one year after the start date.
- Example: for Fall Round 2024, the dates would be 01/15/2025 to 01/15/2026.
Spring Round
- Begin Date should be June 15 of the current year.
- End Date should be one year after the start date.
- Example: for Spring Round 2025, the dates would be 06/15/2025 to 06/15/2026.
Please refer to the Instructions for Preparing an RRF Proposal for more details.