In the Access section, the preparer and other owners (contacts and PI) are listed. One person may hold more than one of these roles. Owners have edit access.
With edit access, you can give other individuals read-only or read/write access to the application. Review Assign Access for how-to steps.
When you connect a SAGE budget to an eGC1, then the Budget Preparer is listed in addition to the eGC1 Preparer, and the two items have a shared access page.
If you create an Advance Budget Request for the eGC1 (with or without a connected budget), the Advance Preparer(s) and any others assigned access to the Advance will also be listed in the Access section of the eGC1’s page.
Anyone with read/write access can delete an eGC1 in Composing status.
You can delete an eGC1 in Withdrawn or Returned status, if
You have read/write access AND
The eGC1 was completed or re-completed more than six months ago.
If the eGC1’s status is Routing or In OSP with Ready to Submit marked No, you will need to withdraw it before you can delete it. You cannot withdraw an eGC1 at In OSP status and marked Yes for Ready to Submit. Instead, contact OSP and request they return the eGC1.
To delete the eGC1:
Click the delete icon (trash can) on the top navigation bar.
Click OK to confirm that you want to delete the eGC1.
Once you have routed your eGC1 to its reviewers, the links that display on the screen will reflect the status of your application.
You will see the “ready to submit” question and answer for reference.
View Entire eGC1 (PDF)
Click this link to preview or print the entire eGC1. The printout will have a date and time stamp which provides the Last Modified date and time. If you withdraw and re-route the application, you must reprint the final eGC1 in order for these dates to match.
Print Final Routing Sheet
Click this link to preview or print the Routing Sheet. If you will be submitting paper documents to campus reviewers and OSP, attach a copy of the final Routing Sheet to a copy of the application and provide it to each of the units that will review. The Routing Sheet content is based on the content on the eGC1: department and dean for the PI, personnel, organization code receiving funding, and some compliance questions. The Routing Sheet has two purposes:
Provide a link between the paper documents and the online record.
Provide a list of the units needing to approve this application. Use the check boxes to indicate which copy is for which unit.
View Final Approval Graph
Click this link to view the final Approval Workflow. If you modify the eGC1 data in any manner, the Approval Graph may change. The data in the eGC1 – department and dean for the PI, personnel, organization code receiving funding, and some compliance questions – as well as the rules for each organization involved with this project determine which units are on the Approval Graph.
Under the standard approval process, the Principal Investigator is the first approver notified for the application. In circumstances when the PI is in the field and unavailable to approve via the internet, the first reviewer for the Cost Center Receiving Funding can approve on behalf of the PI. Usually, this is a Department Reviewer. This means that an ad hoc approver cannot approve for the PI.
A person (other than the PI) with read/write access to the eGC1 would check the PI Escalation box on the Certify & Route page to request that another reviewer approve on behalf of the PI.
Checking the box will escalate the approval for the PI to the first reviewer for the Cost Center Receiving Funding. The system will send email notifications to both the PI and the first-level reviewers. Depending on the department’s local policy, you may need to add the chairperson to the chart using the Add Approver function. You may need to submit a written request to the Chair (check with your administrator).
When the Cost Center Receiving Funding unit reviewer, or the PI’s selected unit reviewer, approves the Application online, their approval will also mark the PI box as approved. Therefore, when “Jayne the Reviewer” approves for “Dept X”, the PI box on the approval flow will show that “Jayne the Reviewer” also approved for the PI. This approval by the department constitutes an endorsement of all aspects of the application. It should not be used as a routine convenience.
Note: Any Application PI or Multiple PIs added to the approval flow cannot approve for the eGC1 PI.
Escalation Not Allowed
Depending on the sponsor, this feature may not be available. For example, it is not available for NIH applications.
In that case the following version of the section would appear.
The process of adding an attachment to standard eGC1 pages or Grant Runner forms is the same.
Grant Runner File Names: There are a few differences in how you name a file for attachments on Grant Runner forms. In addition, all Grant Runner attachment names must be unique across all forms. If you do add the same file a second time, SAGE will append a number to the file name to ensure it is unique. So, “myfile.pdf” when added again will become “myfile1.pdf” to meet the uniqueness rule.
Notes:
The file name must be no more than 50 characters in length, including spaces, and end with .pdf in lowercase.
Use one space (not two or more) between words or characters and do not begin the filename with a space or include a space immediately before the .pdf extension.
Avoid the use of ampersand (&) since it requires special formatting.
The NIH allows file names that contain certain characters. See the following table, which contains each character allowed and an example using the file name xyz.pdf with the inserted character in bold.
Characters
Example File Name
Alpha-numeric characters: A-Z, a-z, 0-9
Xy23Z.pdf
Underscore
x_yz.pdf
Hyphen
x–y–z.pdf
Space
x y z.pdf
Period
x.yz.pdf
Parenthesis
x(yz).pdf
Curly Braces
{xy}z.pdf
Square Brackets
x[y]z.pdf
Tilde
~xy~z.pdf
Exclamation Point
xyz!.pdf
Comma
xy,z.pdf
Semi-colon
x;yz.pdf
Apostrophe
x‘yz.pdf
At Sign
xy@z.pdf
Number Sign
x#yz.pdf
Dollar Sign
$xyz.pdf
Percent Sign
xy%z.pdf
Plus Sign
x+yz.pdf
Equal Sign
xy=z.pdf
Note: For full details on NIH attachments, review their Format Attachments page.
Click on the Add Attachment link to start the process. The Upload Attachment dialog will display.
Description
Provide a short description of your document file that is helpful to reviewers. You may want to use the word “draft” or “final”. Example: Science Final, Draft Proposal.
Grants.gov application descriptions should include the eGC1# and PI last name; you can append additional information to the end of the file name. This will help reduce errors and streamline the Grants.gov submission process for the OSP Administrators.
File
Select Browse to search for your document, or the equivalent step for your web browser (for example, Choose File).
To complete the process, select Upload to attach the document to the eGC1. Clicking the Cancel link will exit the process.
If there is a problem with the file name for a Grant Runner attachment, a dialog box will display indicating the naming rules.
If you upload a file with the same name as an existing Grant Runner attachment, the system will append a number to the file name to ensure it is unique. So, “myfile.pdf” when added again will become “myfile1.pdf” to meet the uniqueness rule.
Attachment Information
Once you upload your attachment, the following information displays, as shown in the following image.
Field
Field Description
Description
Displays the value entered. Click on the description to view the attachment.
File Name
Displays the name of the file as it was saved on the computer or local server.
Version
The system will automatically assign the version number of each file as it is attached or updated. The version number is the number one (1) when you initially attach a file.
Attached On
Displays the date and time that the attachment was added to the eGC1.
Delete a Document
You can only delete an attachment for a standard eGC1 if the eGC1 is in “‘Composing” or “Withdrawn” status and no approval actions have occurred. That is, when no one has approved, marked as watched, added a comment, or returned the eGC1. If the conditions allow, the system displays a Delete link to the right of the file information. Selecting Delete removes the attachment from this eGC1.
Note: On a Grant Runner eGC1, you are allowed to delete files from a Grant Runner form when the eGC1 is in “Composing,” “Withdrawn,” or “Returned” status if the file is not a required one.
Update an Existing Document
The Update link will only appear after a reviewer has approved, marked as watched, added a comment, or returned the eGC1 and the eGC1 has a status of “Withdrawn” or “Returned”. Selecting Update allows you to attach a newer version of a current document. You can display the prior versions of the updated file by clicking on the arrowhead to the left of the Description. Only the most recent version of an attached file is submitted.
If you have attached a file to the wrong place in an eGC1, you can update it with a document that indicates the file is incorrect and should be ignored.
Calculate and enter the amount of Direct Costs to which the F&A cost rates will be applied. This may be Modified Total Direct Costs (MTDC), Total Direct Costs, or zero (no F&A costs charged). Use the sponsor guidelines and GIM 13 to determine which method of calculation you should use. For Industry Sponsored Clinical Trials, apply the 25% indirect cost rate to the TOTAL direct costs. This includes items often listed in subcategories (for example: IRB review fees, IRB processing, pharmacy set-up, study start-up fees).
F&A cost rate
Enter the F&A cost rate that applies to your proposal (for example, 54.5%). Enter Multiple in this field when:
Your project includes multiple locations, each with its own rate
More than one F&A negotiated rate is in effect for the period in question
Do not enter Multiple in cases where the F&A rate changes over the life of the project, but remains stable for the period in question.
Total F&A costs
Calculate and enter the F&A costs for the first budget period and the total for all budget periods. Hint: SAGE Budget calculates F&A costs automatically for you.
For Grant Runner users, read about the Sponsor Budget Map page for syncing your SAGE Budget data to the RR Detailed Budget form of your Grant Runner application.
Review the SAGE Budget and eGC1 Shared Access Data page to learn how contacts and people assigned access on your eGC1 and its connected SAGE Budget are combined on a shared access page.
From this page, you can connect a budget you created in SAGE Budget to your eGC1. Any time you update the connected budget, the changes will automatically appear on the eGC1 budget page, so the information is always current.
Select Connect a Budget to display the Choose Budget window.
Enter your search value, and then click Search. Note: Budget ID is the default field used to search. Use the drop-down menu to select a different option (title, PI last name, sponsor name, etc.).
From the Budget Search Results, locate your budget and click Select at the far right.
Select the period of the budget you want to connect with your eGC1. Note: You can only connect one budget period to an eGC1. See below for reasons why your budget period may not be available.
If you are submitting a new application or competing renewal, be sure to include the Budget Total Column. This will display the totals for all periods on the eGC1 Budget page. If you choose not to include the totals, then on the eGC1 Budget page just the Total (All Periods) column will display the values from the selected period.
Select Apply to eGC1 to connect your budget to the eGC1. Any updates you or other users make to the budget will automatically display in your connected eGC1.
When you select a budget period, the system imports all the data from your budget worksheet and from any sub-budget worksheets into your eGC1 for that period. SAGE does not import certain types of information from a budget to an eGC1:
Org code receiving funding
Personnel
Budget period dates
non-standard (customized) base information
SAGE also does not validate that these budget values match the ones in the connected eGC1. If the information does not match, OSP will use the eGC1 as the system of record.
Budget period availability: There are three possible reasons why a budget period may not be available for connection:
You may have already connected it to another eGC1. You can only connect a budget period to one eGC1.
You must connect Budget periods in a linear fashion. You cannot connect a budget period to an eGC1 if you have already connected any following period to an eGC1.
You may have connected a previous budget period to an eGC1 which OSP has not yet approved. You must wait until OSP has approved the connected eGC1 before you can connect a subsequent budget period to a new eGC1.
Once you connect your budget, you will see two additional links:
The budget’s number and title. Click this to open the budget worksheet in a separate browser window or tab.
A Disconnect the budget link
When the SAGE Budget is disconnected, you will have the option to retain or delete the data in the eGC1 Budget page and the RR Detailed Budget form. If you choose to retain the data, the RR Detailed Budget form will become editable.
When a budget is connected to an eGC1, the budget is not editable while the eGC1 is in Routing or In OSP status. When the eGC1 is Approved, the version of the budget at that point is captured. The approved version of the budget can be viewed from the eGC1 Attached Documents page or History & Comments page, or from the Budget’s History page.
Post-Approval, the budget once again becomes editable which allows you to update a multi-year budget from the proposed values to the awarded ones to help plan for future project periods. The link on the eGC1 budget page will open the current version of the connected budget.
If you have a permission type of Owner or Read/Write, or have the ASTRA Global Edit role for the appropriate organization codes, you may give access to the eGC1 or Budget to other SAGE users.
Add a Person
Click on the Add User link on the Contacts & Assign Access page to open the Personnel Chooser. Search for and select the person.
Select the appropriate permission type (Read Only or Read/Write) for this person from the pull-down menu.
Remove a Person
Change the Permission Type value to No Access and click the Save icon to remove someone from the Assigned Access list.
When you choose to remove yourself from the access list, a warning message will appear. If the change you are making removes your last access to this item, once you confirm the change, the tasklist will display.
See the Access Permissions page for more information about permission levels in SAGE. Read the SAGE Budget and eGC1 Shared Access Data page to learn how contact and permission information is displayed on a shared access page from both your eGC1 and its connected SAGE Budget.
The information displayed for each person with access is:
Name
Permission Type: The permission level for the individual.
Owner:
On an eGC1, the following people are automatically owners: Principal Investigator, Administrative Contact, Pre-Award Budget Contact, and eGC1 Preparer. The Budget Preparer is also an owner on the eGC1 if a Budget is linked.
On a Budget, the following people are automatically owners: Administrative Contact, Pre-Award Budget Contact, and Budget Preparer. The eGC1 Preparer is also an owner on the Budget if an eGC1 is linked. The person with the role of PI on a Budget is not give owner status by default. However, if the Budget is linked to an eGC1, the PI for the eGC1 then has owner status for both the Budget and the eGC1.
Read Only or Read Write: Assign one of these permissions when you add someone.
Reason: For owners, their relationship is listed. All others have a reason of Assigned Access.
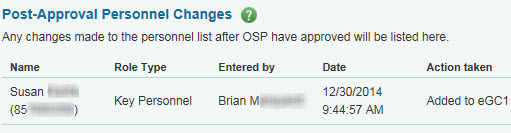
Once OSP approves the eGC1, this section will display the change history for Personnel on the eGC1.
The following changes are included:
A person is added or deleted
A person’s role changes
A person’s investigator status changes
You can make these changes on the eGC1 or through the Financial Interest Disclosure System (FIDS). Note that you can only change the PI from the the eGC1. If you change the PI, you will see a warning message with a reminder to contact OSP if sponsor approval is required.
When you copy an eGC1, the Personnel Changes section of the original eGC1 is not included.
For each change, the following information is displayed:
The Name and employee ID of the person whose information has changed
The Role Type of the person prior to the change
The name of the individual who made the change (Entered by)
The Date and time of the change
The Action Taken
Added to eGC1
Deleted from eGC1
Investigator status change from <old value> to <new value>
Role changed from <old value> to <new value>
SFI value changed from <old value> to <new value>
Indicated current participation (this change would be made from within FIDS)