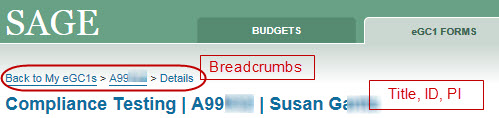
Below the main tabs in SAGE at the left side of the page is a breadcrumb trail which you can use to return to your My eCG1s tasklist. When an item is open the breadcrumb reads “Back to My eGC1s” followed by the item number (for example, A999999), and then the name of the page you are on. Selecting the item number returns you to the Details page which is the page you see when you first open an eGC1.
Below the breadcrumb is the page heading made up of the eGC1’s Short Title, ID, and the name of the PI, separated by the vertical bar character. This appears on every page as a quick reference.
Action Bar Icons
On the right side of the page, just below the heading is a set of icons that allow you to do a number of actions. These are described in order from left to right.
Previous Page: a straight left-pointing arrow moves you to the prior page on the left navigation menu
Next Page: a right-pointing arrow moves you to the next page on the left navigation menu
Save Page: a diskette icon which saves a copy of the current values in the eGC1 to the database
Reset Form: a curved, left-pointing arrow which clears any un-saved values from the page
Create a copy of this eGC1: a double-page icon which opens a new eGC1 (after confirmation pop-up) that is a partial copy of the original (see the Copy an Existing eGC1 article)
Delete this eGC1: a trash can, that appears when the eGC1 status allows, and lets you Delete an eGC1
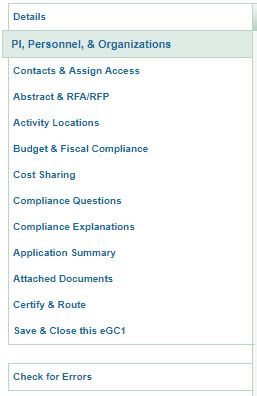
Left Navigation Menu
When you are viewing an eGC1, a navigation menu appears on the left side of the window. It lists all of the pages that are part of the eGC1, and includes links to Save & Close the eGC1 and to Check for Errors. You can click on any page link to move to that page. The page you are currently viewing will be highlighted in the menu. In this example, the PI & Personnel page is highlighted.
If your application is in Approved, Awarded, or Denied by Sponsor status, then an additional “View Funding Status” link displays. Clicking this link will take you to the MyResearch Funding Status page for the application. Note: As of July 6, Funding Status and Non-Award Agreement data may be out of sync with SAGE and Workday until MyResearch is remediated. Please use SAGE to review eGC1 and award status until further notice.
Under the appropriate conditions, one of two additional links will appear: Permanently Withdrawn or Denied by Sponsor. See the linked articles for details.
Footer
In the footer of an eGC1 page, there is a Previous link and either a Continue or Next button (depending on the page you are viewing). Just like the arrow icons in the “action bar” clicking Previous will move you to the prior page in the left navigation menu. Clicking the Continue or Next button will move you to the following page.
Closing an eGC1
In order not to lock out a colleague who may also need to work on an eGC1, you should always exit an item using SAGE links.
You have a few options for closing an eCG1:
Use the Save & Close this eGC1 link in the left navigation menu
Use the Back to My eGC1s breadcrumb
Click on the eGC1 FORMS tab
Each of these methods will save any changes that were made, and release the item so that another person would be able to edit it.
Saving eGC1 Data
The data values in your eGC1 are saved whenever you do any of the following:
Click the Save icon in the action bar
Navigate to a different page of your eGC1
by using the Next or Previous arrows in the action bar
by using the button/link in the footer of a page
by clicking on a different page link on the left navigation menu
Click the Save and Close this eGC1 link from the left navigation menu
Access permissions govern what a user may see and do with a specific eGC1 (and connected budget) in SAGE.
The eGC1 Preparer, Principal Investigator (PI), Administrative Contact, and Pre-Award Budget Contact are automatically Owners of the eGC1.
When you link an eGC1 and Budget, the Budget Preparer also becomes an owner of the eGC1
If you create an Advance Budget Request for the eGC1 (with or without a connected budget), the Advance Preparer(s) and any others assigned access to the Advance will also be listed in the Access section of the eGC1’s page
Any owner, any user with Read/Write permission, or any user with the Global Edit ASTRA role for the appropriate Cost Centers may give Read-Only or Read/Write access to other SAGE users.
Different permission types have different access rights:
Owner
Read/Write
Read-Only
Global Editor
Approver
Watcher
View Contents
Yes
Yes
Yes
Yes
Yes
Yes
Edit Contents
Yes
Yes
No
Yes *
No
No
Assign Access
Yes
Yes
No
Yes *
No
No
Delete
Yes
No
No
No
No
No
Complete
Yes
Yes
No
No
No
No
Withdraw /
Re-Complete
Yes
Yes
No
Yes *
No
No
Return
No
No
No
No
Yes
No
Add Reviewer or Watcher
Yes
Yes
No
**
Yes
No
Add Comment
Yes
Yes
No
**
Yes
Yes
* Note: A Global Editor can edit or withdraw an eGC1 only if the editor’s span of control matches the Cost Center of an approving unit. Global Editors access eGC1s from the My Approvals tab. Note that you cannot see eGC1s in Composing status on the My Approvals tab.
** A Global Editor cannot add reviews, watchers, or comments even if they has Read/Write assigned access to the eGC1.
To create an Advance Budget Number Request for an eGC1, you must be an owner or have been assigned access – either Read/Write or Read-Only. For Global Editors, this means you must open the eGC1 from the Approvals tab and assign yourself access (or change one of the contacts, if appropriate). Then you can create an Advance.
It has a status of Composing, Withdrawn, or Returned
Editing exceptions are:
The Contacts & Assign Access page of an eGC1 is always editable
The PI, Personnel & Organizations page is also editable for an eGC1 with a status of Approved, Awarded, or Denied by Sponsor
Changing a Routing eGC1
If you need to make changes to a routing eGC1, you must start by withdrawing it from routing. Before you withdraw your eGC1, you may want to contact approvers to let them know that you plan to do so. A routing eGC1 would have a status of Routing or In OSP.
To withdraw and then re-route the eGC1:
Click Certify & Route on the left navigation menu.
Click the Withdraw button in the Update Application section at the top of the page.
Make the changes to your eGC1, and then return to the Certify & Route page.
Scroll down to the Process Application section, and click Route to Reviewers. When you click Route to Reviewers, the eGC1 moves back into routing and becomes locked for editing.
Any approver who already approved your eGC1 is not contacted again. If you make a major change, you may add them back into the approval graph as ad hoc approvers.
Note: If you have marked your eGC1 Yes for Ready to Submit and it is at In OSP status, you must contact OSP to return your eGC1 in order to make changes.
Read/Write Access to the eGC1
The eGC1’s owners and any users specifically assigned read/write access on the Contacts & Access page can edit an eGC1.
The owners are:
PI
Administrative Contact
Pre-Award Budget Contact
eGC1 Preparer
Budget Preparer, if a SAGE Budget is linked to the eGC1
Users with a SAGE ASTRA role of Global Edit with a Cost Center that matches any Cost Center for a reviewer in the approval flow can also edit an eGC1. Note: Global Editors access completed eGC1s from the My Approvals tab. A Global Editor cannot access an eGC1 in Composing status with just the Global Editor role.
You can make a copy of any standard eGC1 that you have access to by clicking on the Copy icon in the top, right corner of the eGC1 page.
Note: When you copy a Grant Runner eGC1, the new eGC1 will be a standard one.
When you select the Copy icon, you will see an information page listing what data is not copied. This information is also detailed below.
Click the Confirm Copy button to complete the process. The page will refresh and will display the Details page of the new eGC1.
You also have the option to Cancel the copy process, or to Print a basic version of the information page for reference.
You may find it useful to copy an eGC1 when you want to:
Create a template eGC1 with a PI, Contacts, and the Cost Center Receiving Funding to use as the basis for new eGC1s. Leave it in Composing status so you can reuse it as needed
Revise an earlier application that was not funded
Submit a non-competing renewal
Submit a single application to multiple sponsors
Data NOT copied from the original eGC1:
Specific dates, such as the sponsor deadline, the start and end dates
Cost Center – either Receiving Funding or Additional Organizational Unit Reviewers: If a Cost Center on your original eGC1 is above the department level or expired, the system will not copy it, so you will need to select a new Cost Center
Sponsor: If the sponsor on your original eGC1 is no longer active, the system will not copy it, so you will need to select a new sponsor.
Connected Budgets
Cost Sharing data
Personnel Investigator Status; it will default to Yes
Answers to Compliance Questions
Attached files
Sponsor forms included in Grant Runner applications
The Approval Graph
Any Post-Approval Personnel Changes
How do I manage eGC1 changes during the approval process?
You can Withdraw an eGC1 that is routing for approval, which makes it editable. Once you have made your changes, click the Route to Reviewers button on the Certify & Route page to re-complete the eGC1 and move it back into the routing process. This will display a pop-up window for you to enter notes about the changes. Make sure your browser is not blocking pop-ups.
When you have read-write access to an eGC1, but find that you are in read-only mode, it can be frustrating.
There are three possible reasons why your eGC1 might open in read-only mode:
Reason
Description
Status
To make changes to a Routing eGC1, you must withdraw it. If your eGC1 has reached In OSP status and you have indicated “Yes” for the Ready to Submit question, contact OSP to have them return the eGC1 to you; otherwise you can withdraw it.
Locked for Editing – 1
Your eGC1 was already being edited by another user when you opened it. Only one person may have an eGC1 open for editing at a time. You can see who is currently editing an eGC1 by looking at the top of any page.
To resolve this situation, contact the person who is editing the eGC1 and ask them to close the eGC1 to allow editing by a different person.
Locked for Editing – 2
Another user recently exited your eGC1 without closing out of the eGC1 correctly. When this occurs, the system maintains an active status for the eGC1 in the SAGE database for 45 minutes, even after the user closes his or her browser.
To resolve this, the user who exited incorrectly must log back into SAGE, re-open the item, and then close out properly. If the user is unavailable, you can wait 45 minutes, at which point the system will automatically log the person out, or you can call the ORIS Help Desk (685-8335) for further assistance.
Note: To close an eGC1 properly, click the Save & Close this eGC1 link or the Back to My eGC1s link. Do not just close your browser window.
An Advance Budget Number Request is made for a specific eGC1. You must be an owner of the eGC1 or have Read/Write access to create an advance. The owners of an eGC1 are the PI, Administrative Contact, Pre-Award Budget Contact, eGC1 Preparer, and Budget Preparer (if the eGC1 has a linked budget). You can request access to an eGC1 from a current owner or someone with Read/Write access.
Global Editors
If your only access to an eGC1 is through the Global Edit ASTRA role, then you need to add yourself to the eGC1 first. Open the eGC1 (from the Approvals tab) and use the Contacts & Access page to assign yourself direct access (or change the preparer or a contact, if appropriate). You can then create an advance.
The steps to do this are:
Find and open the eGC1 on the Approvals tab.
Go to the Contacts & Assign Access page.
Click the Add Another User link in the Access section.
Once OSP approves the eGC1, this section will display the change history for Personnel on the eGC1.
The following changes are included:
A person is added or deleted
A person’s role changes
A person’s investigator status changes
You can make these changes on the eGC1 or through the Financial Interest Disclosure System (FIDS). Note that you can only change the PI from the the eGC1. If you change the PI, you will see a warning message with a reminder to contact OSP if sponsor approval is required.
When you copy an eGC1, the Personnel Changes section of the original eGC1 is not included.
For each change, the following information is displayed:
The Name and employee ID of the person whose information has changed
The Role Type of the person prior to the change
The name of the individual who made the change (Entered by)
The Date and time of the change
The Action Taken
Added to eGC1
Deleted from eGC1
Investigator status change from <old value> to <new value>
Role changed from <old value> to <new value>
SFI value changed from <old value> to <new value>
Indicated current participation (this change would be made from within FIDS)
On the eGC1’s Cost Sharing page, a small bug was causing an error when attempting to enter in data into the Third Party Cost Sharing fields for the first time. This has been fixed.
At times a 99 error would occur when editing an eGC1 where a budget was linked to multiple eGC1s and one of the eGC1s was in Denied or Permanently Withdrawn status. This has been fixed.
To be able to make changes to a routing eGC1, you need to start by withdrawing it from routing. Before you withdraw your eGC1, you may want to contact approvers to let them know that you plan to do so.
You can click the Withdraw button on the Certify & Route page in the Update Application section to make an eGC1 that is routing for approval editable. Once you have made your changes, click the Route to Reviewers button on the Certify & Route page to re-route the eGC1. You must add comments when re-routing an eGC1 that has had at least one approval.
Approvers who have already approved your eGC1 will not be notified again. If you make a major change, you may add them back into the approval graph as ad hoc approvers.
Note: If you marked Yes for Ready to Submit and your eGC1 has reached In OSP status, you cannot withdraw it. Instead, contact OSP and request they return the eGC1.
Any reviewer can use the Return process to make your eGC1 editable also. The reviewer will enter required comments which are part of the email notification to the eGC1 owners. See Return an Application in the Approvals User Guide.
Both withdrawing and returning make the eGC1 editable by its owners, those with read/write access and those with the Global Editor role.