Add an Ad Hoc Reviewer
Definition of ad hoc: Formed, arranged, or done for a particular purpose only; from Latin, meaning “for this.”
An owner (PI, preparer, contacts), a person with assigned read/write access, or an approver, can add an ad hoc reviewer to the approval flow. These manually added reviewers can be for a particular role, such as a department reviewer, or can be a specific person.
Note: There is a known issue when the person with an owner role or read/write access also has a Global Edit role for the corresponding Cost Center—the links to add an ad hoc reviewer will not appear. Contact the ORIS Support Desk for assistance.
The process to add an ad hoc approver or watcher is basically the same. The only difference is that the approver needs to take action and approve the eGC1, while the watcher is not required to act. For this section we’ll use the term “reviewer” to refer to either an approver or watcher.
Open the Certify & Route page of your eGC1 and select the “View Final Approval Graph” link at the bottom of the page. This will open a separate window displaying the graph.
In the Approval Status Data section, select either the Add Approver or Add Watcher link to add a person or role (for example, Dept. Reviewer) to the approval flow. This function may be used when:
- An additional person or role needs to approve
- An existing approver needs to re-approve
- A person or role needs access to view (watch) the eGC1
Note: If a division, department or dean’s reviewer needs to re-approve an application, add the appropriate ROLE (not person) to the graph. The approval history will show the unit name and the name of the person who approved, providing a more complete audit trail.
The eGC1 must be in either Routing or In OSP status for you to add an ad hoc reviewer.
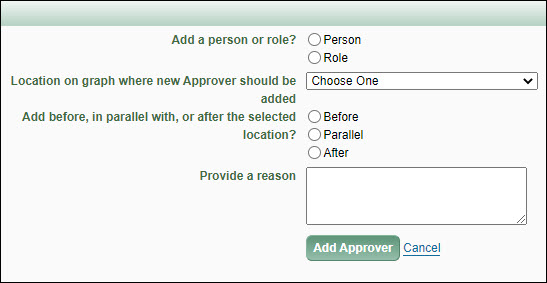
To begin the process, click on either the Add Approver or Add Watcher link to open the corresponding window, as shown in the image below. The following steps are the same for both.
Adding a Person
- The first question asks whether you are adding a person or role. Select Person. A “Person to add” field appears, as shown below:

- Select Look Up Person to open the Personnel Chooser.
- Search by Name or UW NetID for the person you want to add.
- Select the name of the person you want, which returns you to the Add Approver or Add Watcher window.
Adding a Role
- The first question asks whether you are adding a person or role. Select Role.
- Use the Role to add drop-down menu to select the role you want to add.

- For roles that require the specification of a Cost Center:
- Select Look Up Cost Center to open the Cost Center Chooser.
- Search for and select the appropriate Cost Center ID, which returns you to the Add Approver or Add Watcher window. The Change the Cost Center link will appear after the Cost Center is chosen. Select the Change the Cost Center link to choose a different Cost Center. The following image shows an added role and code:

Placing the Reviewer in the Flow
The next step is to select a location on the graph for the added reviewer based on an existing reviewer:
- Location on graph where new Approver/Watcher should be added: Use the drop-down list to select an existing reviewer. The drop-down list is unique to each eGC1 approval flow. DO NOT choose the OSP node, as it will cause errors in the flow.
- Add before, in parallel with, or after the selected location? Choose one from before, parallel, or after.
The following image shows these fields with example values:

A new node will be added to the approval chart in this location.
An email notification will be sent to the reviewers for the role, or the specific person added, at the appropriate time in the approval flow process.
Provide a Reason
Enter a comment to describe why this role or person needs to review this eGC1. This comment will display on the History & Comments page.
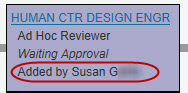
The Updated Graph
As an example, we chose Human Centered Design Engineering as the ad hoc role to add to the flow. The new reviewer was located in parallel with the existing Dept Reviewer for Lab Medicine-Pathology node. The image shows the new node directly above that of Bioengineering on the same thread (line) of the graph.
On the node, the role description is Ad Hoc Reviewer. When the person who added the node views it, they will see a Delete link. Only the person who added the ad hoc reviewer node can remove it. For more details, see Delete an Ad Hoc Reviewer.

When other reviewers see the ad hoc node, they will see the name of the person who added it instead of the Delete link.