Definition of ad hoc: Formed, arranged, or done for a particular purpose only; from Latin, meaning “for this.”
An owner (PI, preparer, contacts), a person with assigned read/write access, or an approver, can add an ad hoc reviewer to the approval flow. These manually added reviewers can be for a particular role, such as a department reviewer, or can be a specific person.
Note: There is a known issue when the person with an owner role or read/write access also has a Global Edit role for the corresponding Cost Center—the links to add an ad hoc reviewer will not appear. Contact the ORIS Support Desk for assistance.
The process to add an ad hoc approver or watcher is basically the same. The only difference is that the approver needs to take action and approve the eGC1, while the watcher is not required to act. For this section we’ll use the term “reviewer” to refer to either an approver or watcher.
Open the Certify & Route page of your eGC1 and select the “View Final Approval Graph” link at the bottom of the page. This will open a separate window displaying the graph.
In the Approval Status Data section, select either the Add Approver or Add Watcher link to add a person or role (for example, Dept. Reviewer) to the approval flow. This function may be used when:
- An additional person or role needs to approve
- An existing approver needs to re-approve
- A person or role needs access to view (watch) the eGC1
Note: If a division, department or dean’s reviewer needs to re-approve an application, add the appropriate ROLE (not person) to the graph. The approval history will show the unit name and the name of the person who approved, providing a more complete audit trail.
The eGC1 must be in either Routing or In OSP status for you to add an ad hoc reviewer.
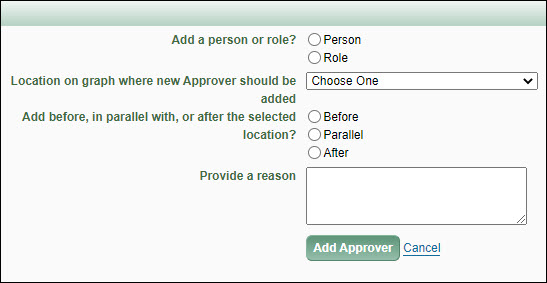
To begin the process, click on either the Add Approver or Add Watcher link to open the corresponding window, as shown in the image below. The following steps are the same for both.
Adding a Person
- The first question asks whether you are adding a person or role. Select Person. A “Person to add” field appears, as shown below:

- Select Look Up Person to open the Personnel Chooser.
- Search by Name or UW NetID for the person you want to add.
- Select the name of the person you want, which returns you to the Add Approver or Add Watcher window.
Adding a Role
- The first question asks whether you are adding a person or role. Select Role.
- Use the Role to add drop-down menu to select the role you want to add.

- For roles that require the specification of a Cost Center:
- Select Look Up Cost Center to open the Cost Center Chooser.
- Search for and select the appropriate Cost Center ID, which returns you to the Add Approver or Add Watcher window. The Change the Cost Center link will appear after the Cost Center is chosen. Select the Change the Cost Center link to choose a different Cost Center. The following image shows an added role and code:

Placing the Reviewer in the Flow
The next step is to select a location on the graph for the added reviewer based on an existing reviewer:
- Location on graph where new Approver/Watcher should be added: Use the drop-down list to select an existing reviewer. The drop-down list is unique to each eGC1 approval flow. DO NOT choose the OSP node, as it will cause errors in the flow.
- Add before, in parallel with, or after the selected location? Choose one from before, parallel, or after.
The following image shows these fields with example values:

A new node will be added to the approval chart in this location.
An email notification will be sent to the reviewers for the role, or the specific person added, at the appropriate time in the approval flow process.
Provide a Reason
Enter a comment to describe why this role or person needs to review this eGC1. This comment will display on the History & Comments page.
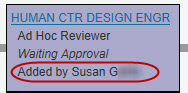
The Updated Graph
As an example, we chose Human Centered Design Engineering as the ad hoc role to add to the flow. The new reviewer was located in parallel with the existing Dept Reviewer for Lab Medicine-Pathology node. The image shows the new node directly above that of Bioengineering on the same thread (line) of the graph.
On the node, the role description is Ad Hoc Reviewer. When the person who added the node views it, they will see a Delete link. Only the person who added the ad hoc reviewer node can remove it. For more details, see Delete an Ad Hoc Reviewer.

When other reviewers see the ad hoc node, they will see the name of the person who added it instead of the Delete link.
Only the person who has added an ad hoc reviewer node can remove it from the approval flow. However, if the ad-hoc reviewer has already provided approval, the node cannot be removed from the approval graph, as it is part of the approval history.
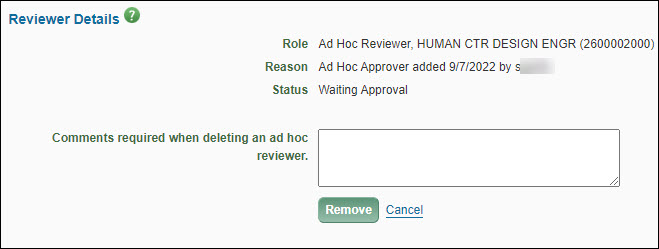
To remove an ad hoc reviewer, click the Delete link in the graph node, or next to the approver on the text flow page. This opens the Remove Reviewer page in a pop-up window. The pop-up contains two sections: Application Details and Reviewer Details.
The Application Details section lists selected fields from the eGC1 to help you confirm you are viewing the correct item. The data fields include:
- eGC1Number
- Full Application Title
- PI Name
- Org Code Receiving Funding
- OSP Due Date
- Ready To Submit value
The Reviewer Details section lists the Role, Reason, and Status for this reviewer and includes a comments field.
Use the Comments required when deleting an ad hoc reviewer field to enter the reason for removal. Select the Remove button to complete the process or the Cancel link to return to the flow page. The following image show this section.
Details about the removal of an ad hoc reviewer will display on the History & Comments page.
Definition of ad hoc: Formed, arranged, or done for a particular purpose only. From Latin, meaning “for this.”
An owner (PI, preparer, contacts), a person with assigned read/write access, or an approver, can add an ad hoc reviewer to the approval flow. These manually-added reviewers can be for a particular role, such as a department reviewer, or can be a specific person.
Be sure, when you add a role, to check that ASTRA has at least one person designated as a reviewer for that node. Otherwise, your application could experience delays in routing.
See Add an Ad Hoc Reviewer and Delete an Ad Hoc Reviewer for more details.
New Features
Additional FG-3 compliance question validation for RRF eGC1s
- eGC1s that have Royalty Research Fund (RRF) as the sponsor will display a validation error if question FG-3, the question about F&A cost reimbursement, on the Compliance Questions page is marked as ‘Yes’. RRF requires FG-3 to always be marked as ‘No’, so this validation error is intended to ensure that the eGC1 preparer selects the correct response prior to completing the eGC1.
Increase character limit in “Reason” field when adding Approvers and Watchers
- The “Provide a reason” field when adding an Approver or Watcher on the Approval Flow Screen has been increased from 250 characters to 1000. Department and School reviewers who add additional Approvers and Watchers like to include detailed instructions in that comment box and needed a higher character limit.
We now will show all recipients on the TO line of SAGE auto-generated email notifications.
- SAGE users will be able to see all persons who received the same Auto-generated SAGE email on the TO: line of the email. This was a frequent request from campus through our help desk and survey responses.
Fixes
Inadvertent sending of disclosure notifications
- Fixed the system to prevent investigators from receiving disclosure notifications when an old awarded eGC1 is opened. The system will now only trigger disclosure notifications when there is an investigator change made to the eGC1 (addition of an investigator or change of personnel to an investigator role).
HSD JIT email notifications are suppressed for RRF eGC1s
- Human Subjects Just-In-Time emails will no longer be sent to the owners of eGC1s where the Royalty Research Fund (RRF) is the sponsor. RRF is an internal UW sponsor and operates differently than external sponsors. Unique characteristics of RRF opportunities include shorter application/review/award timelines and the lack of “fundable score” notifications. These unique characteristics therefore made the Human Subjects JIT email irrelevant and confusing for the owners of the eGC1.
New clarifying message displayed when clicking on Investigator Disclosure History and FIDS Profile is not yet established
- If an Investigator has never completed a disclosure in FIDS, or does not have any disclosure history for the past 12 months, a new user-friendly message stating there is no history will display when the Investigator Disclosure History link is clicked.
New error message displayed when you have attachment upload errors due to hidden or invalid characters in file name
- A new error message will display in SAGE if you attempt to upload eGC1 attachments with invalid characters in the file name. To correct this issue, rename the file on your computer by directly typing in the characters before attempting to upload it in SAGE.
To be able to make changes to a routing eGC1, you need to start by withdrawing it from routing. Before you withdraw your eGC1, you may want to contact approvers to let them know that you plan to do so.
You can click the Withdraw button on the Certify & Route page in the Update Application section to make an eGC1 that is routing for approval editable. Once you have made your changes, click the Route to Reviewers button on the Certify & Route page to re-route the eGC1. You must add comments when re-routing an eGC1 that has had at least one approval.
Approvers who have already approved your eGC1 will not be notified again. If you make a major change, you may add them back into the approval graph as ad hoc approvers.
Note: If you marked Yes for Ready to Submit and your eGC1 has reached In OSP status, you cannot withdraw it. Instead, contact OSP and request they return the eGC1.
Any reviewer can use the Return process to make your eGC1 editable also. The reviewer will enter required comments which are part of the email notification to the eGC1 owners. See Return an Application in the Approvals User Guide.
Both withdrawing and returning make the eGC1 editable by its owners, those with read/write access and those with the Global Editor role.