This article explains how to:
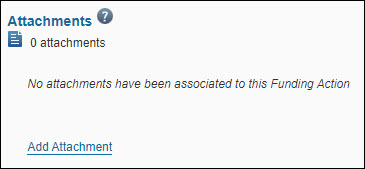
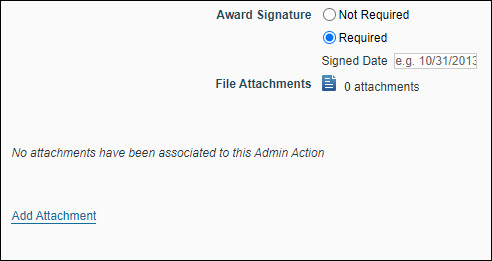
Both Funding Actions (FAs) and Admin Actions (AAs) have an Attachments section where you can upload and view documents.
For FAs, the Attachment section displays just above the OSP Notes History section, near the bottom of the page.

For AAs, the Attachment section displays at the end of the first page section.

The system will automatically attach a copy of any Auto-Generated Document you create for the FA or AA in this section.
SPAERC indicates the number of attachments for FAs just beneath the Attachments heading.
Note: Campus users can view the documents you attach to an action from the Related Documents section of the eGC1.
To attach a document
- Click the Lock icon to unlock the action, if needed.
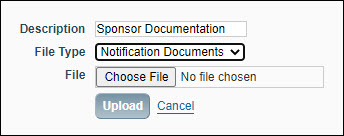
- Click Add Attachment, and then enter a description for the attachment.
- Use the File Type drop-down menu to select the type of document you plan to attach.

- Then click Choose File to locate the file you want to attach, click the file name to select it.
- Click Upload to complete the process. The page will display information about the attachment and the system will update the attachment count.

Note: You can change the File Type after you have attached the document.
To view attached documents
Click the View link to the right of the attachment information to open the attachment in a new window.
To update an attached document
You can upload a new version of the document using the “update” function for the existing attachment. SPAERC maintains all of the attached versions of a document.
- Click Update to the right of the attached document you want to update. The File Type drop-down menu will automatically display the type of the document you are updating.
- Enter a description, browse to find the new document, and upload it. Only the updated version will display in the list of attachments.
- To see the earlier versions of a document, click the “+” to the left of the attachment description to expand the version history. Click the “-” button to contract it.

Note:
- you can update or delete only the most recent version of a document.
- When you update a document, the total attachment count doesn’t change.
To delete an attached document
- Click Delete to the right of the attached document you want to remove.
An FA or PAC with the status of In GCA is editable in SERA. Just as you can click a link and send an action to GCA, GCA has the option to “Return to OSP” any action that needs changes or additional information.
Clicking the return link opens a pop-up window. It includes a comments box for notes to OSP. The “Item will be assigned to” value is the OSP person the action is assigned to when GCA returns it.
When the GCA person clicks the Return to OSP button, the status of the action changes from In GCA to Returned by GCA, and the system automatically assigns the action to the person in OSP named in the Prepared By field (or to the Failover Team if the person is no longer OSP staff).
To see these items on your tasklist, you would need to include the Returned by GCA status in your tasklist option choices.
When you open the action in SPAERC, you can see the new status and assignment, and the action will be editable. It will be read-only for GCA.

You can see any text that GCA added to the GCA Comments field. In the OSP Notes History, you can see the entry for the Status change, with notes from GCA about the needed changes, and the Assignment to the OSP person who prepared the action.

Re-Send to GCA
On the left navigation menu, there will be a link to “Re-Send to GCA” for returning the FA or PAC to GCA once you have made the requested changes.

When you click the link a pop-up window opens, providing you a comment box.
Clicking on the Re-Send to GCA button will complete the process and change the action’s status to Re-Sent by OSP. A pink In GCA banner displays for the action and your access is set to read-only.

In SERA, the changes and notes are visible in the History section, which is similar to the OSP Notes History section, at the foot of the detail page.
When you create a parent\child relationship between an eGC1 and an FA, or between an FA (with parent eGC1) and a PAC, the system will automatically create a compliance hold, if appropriate. To remove any holds, use the Add/Modify Hold link.
Note: Automatic holds only affect PACs that are Extensions or Advanced Extensions.
The system applies automatic holds to FAs and PACs if the research team answered Yes to certain compliance questions on the eGC1, or other conditions exist, as described in the following chart.
| Compliance Hold |
Due to |
| Administrative Support |
Budget & Fiscal Compliance page question F2 = Yes |
| F&A |
Budget & Fiscal Compliance page question F1 = Yes |
| IRB Approval |
Non-Fiscal Compliance page question HS-1 = Yes |
| Cost Share |
Budget & Fiscal Compliance page question F3 = Yes |
| Fed Flow-Through |
Details page has an Originating Sponsor listed with a Sponsor Type of Federal Government |
| SFI/FCOI |
One or more investigators on the PI, Personnel, & Organizations page has an SFI value of Yes or Unknown |
| Export Control |
Non-Fiscal Compliance page: if Yes for any one of questions E-2, D-1, D-2, D-3, D-4 |
| IACUC |
Non-Fiscal Compliance page: question AU-1 = Yes |
| FCOI Training |
One or more investigators on the PI, Personnel, & Organizations page has either not done the sponsor-required FCOI training or the training has expired. |
When the system applies automatic holds, it checks the corresponding boxes on the hold screen and adds automatic OSP notes. A special icon will appear in the tasklist to indicate Compliance holds.

Removal of Holds
You can manually add or remove holds by checking or un-checking the boxes. See the article Place an Application or Action on Hold for complete details.
If the FA’s parent application or the PAC’s parent FA changes, the system may change the holds. The system does not change Non-Compliance holds if the parent application changes.
All holds applied or removed by the system will have a corresponding OSP note added. These notes will display in the Add/Modify Hold dialog window and under the OSP Notes tab.
| Hold Type |
OSP Note Text Display |
| Automatic Compliance Hold Applied |
Automatic Hold applied for: |
| Automatic Compliance Hold Removed |
All compliance holds cleared. |
| Manual Holds Applied (no change) |
On hold for: |
| Manual Holds Removed (no change); |
Item taken off hold: |
In SPAERC, you can change the status of an approved application to Awarded, Denied by Sponsor, and Permanently Withdrawn. You may also view the status history.
Change Status to Awarded
When a sponsor notifies OSP of a project award, you can create a funding action as the child of the appropriate application. When you send (or re-send) the funding action to GCA for processing, the application’s status automatically changes to Awarded. The pink banner in the application will now display “Awarded.”
Change Status to Denied by Sponsor
When you receive notification that the sponsor denied funding for a project, you should change the status of the application to “Denied by Sponsor”.
- From the left navigation menu of the open application, click Sponsor Decision.
- Check the information under Application Details to make sure you are processing the correct application.
- Enter comments in the OSP Notes field regarding the status change. When you change the status of an application to Denied by Sponsor, you must enter comments.
- Click Denied By Sponsor.
This process changes the application status from Approved to Denied by Sponsor. The pink banner will change to “Denied By Sponsor.” The system does not automatically change the individual and group/team assignments for the application. You should assign a denied application to File.
Change Status to Permanently Withdrawn
Occasionally, you may need to withdraw an approved application.
- From the left navigation menu of the open application, click Permanently Withdraw.
- Check the information under Application Details to make sure you are processing the correct application.
- Enter comments in the OSP Notes field regarding the status change. When you change the status of an application to Permanently Withdrawn, you must include comments.
- Click Permanently Withdraw.
This process changes the application status from Approved to Permanently Withdrawn. The pink banner changes to “Permanently Withdrawn.” The system does not automatically change the individual and group/team assignments for the application.
To view status history
From the open application, click the Status tab.
You can mark any action as duplicate. To do so:
- From the Tasklist, search for and open the action that you need to mark as duplicate.
- On the left navigation menu, click Mark as Duplicate.
- Enter a comment in the OSP Notes section to track the changes, if necessary.
- Enter the ID Number for the duplicate item, and then click Mark as Duplicate.