This section contains the values for the person added, as described in the following table. This following image shows the fields with example data for a budget that includes APL benefits.
Field
Description
Name
The person selected in the Personnel Chooser or “TBD” for placeholder personnel
Title
The selected person’s title or the user-entered title for a TBD person.
UW Sub Object Code
The UW Sub Object Code for the person.
Include APL Benefits
Displays if you selected Budget includes Applied Physics Lab (APL) in the Advanced Settings section of the Properties tab. If checked, the Benefit Type for this person will be APL.
Benefits Exemptions
Provides current HR benefit exemption information on the individual.
Current Campus or APL Benefit Rates
Displays the appropriate benefit information for this person.
If Include APL Benefits is checked, the two APL Rates will display.
Cascade Entries
If checked, will indicate that the system cascaded salary values across periods.
Project Role and Effort
This section indicates whether the person’s position is Calendar or Academic, their role in the project, and the amount of effort.
Field
Description
Worker Position Type
Calendar is a 12-month period. Academic/Summer consists of a 9-month academic period plus a 3-month summer period.
Project Role
Roles are:
Principal Investigator
Application PI
Multiple PI
Mentor
Co-Investigator
Faculty
Key Personnel
Post Doctoral Associate
Graduate Student
Undergraduate Student
Secretarial/Clerical
Fellow (deprecated)
Other (default)
% Effort
Academic % Effort
Calendar % Effort
Used to calculate the Person Months, Period and Project Totals for the person’s (01) Salaries and Wages line items. It is dependent on appointment type.
For a “Calendar” appointment, the percentage of effort is calculated on a 12-month period.
For an “Academic” appointment, the effort periods are broken into two terms, Academic (9 months) and Summer (3 months).
Academic Hours Per Month
Summer Hours Per Month
Displayed only for Academic Appointment types, once for Academic and once for Summer. The value is equal to the % Effort times 173.3 (the number of hours in a standard month).
Salary, Wages, and Stipends
This section displays information about the person’s earnings.
Note: Salaries are adjusted to reflect any salary cap on the Targets & Caps Tab. Personnel with a capped salary are indicated.
Field
Description
Date Retrieved
System-generated date (mm/dd/yyyy) indicating when the salary information was retrieved from the source system.
UW Monthly Salary
The salary of the person based on a 100% FTE.
Clinical Monthly Salary
The clinical salary information where applicable.
The earnings table lists all of the earnings for the selected person.
Column
Description
Checkbox
This is checked by default to include this row in the Starting Monthly Salary total
PositionID
Unique identifier for the Workday position
Obj-SubObject
This value is 01 for Salary and Wages, followed by the sub-object code for the selected person
Cost Center
Cost center name and code
Organization
Organizational unit name and 10-digit code
Position Title
Selected person’s title for this position
Pay Type
Possible pay types are:
Allowance
Stipend
Basepay
Administrative and Endowed Supplements are included for Non-Faculty Personnel.
Unallocated Rate
Monthly or Hourly Rate
Distribution %
Proportion of total for this earning type
FTE Rate
Total of Unallocated Rate value times the Distribution percent
The Starting Monthly Salary field will reflect the total of the selected (checked) earning rows.
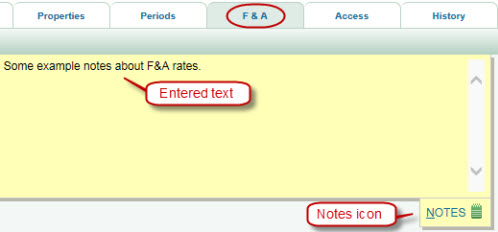
Notes
This section displays any user-entered notes for this personnel entry.
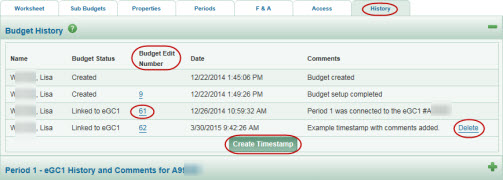
The Budget History section lists different versions of the budget with status, dates, and comments. The eGC1 History section displays if the budget is linked to an eGC1, showing the approval history.
Budget History
The Budget History table includes an entry for each status change and for any “timestamp” versions created, as shown in the following image.
Budget Edit Numbers
Each time a budget change was saved, the Budget Edit Number incremented. So the first number shown includes all of the data saved from the creation setup steps.
Note: Only Budget Edit Numbers associated with key actions, such as a change to the status of the budget, display in the Budget History.
To see a read-only version of the budget at a specific point in time, click the corresponding Budget Edit Number in the table. The budget will open in a new window with a red “read-only” banner. Use the Close Window link in the upper right to close this display.
Timestamps and Comments
The system automatically logs a comment in the Budget History for certain actions. Timestamps could also have been created manually, with optional comments.
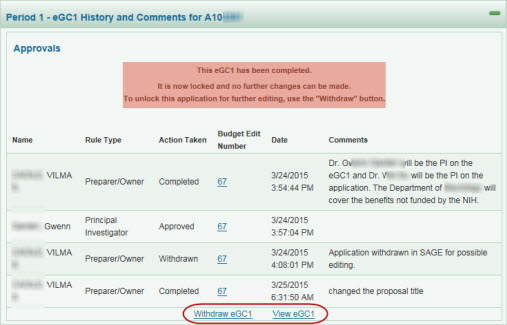
Linked eGC1 History
If one (or more) periods of the SAGE budget is linked to an eGC1, the approvals history for each eGC1 will display below the Budget History. The section title is made up of the period description and the phrase “eGC1 History and Comments for” followed by the eGC1 number.
Select the section heading (eGC1 History and Comments) or the plus sign to expand the section. The history will include a Budget Edit Number for each entry, making it easy to see if the budget changed during the eGC1 approval process. The following image shows an example of this section.
Select the View eGC1 link to display the eGC1 in a new window.
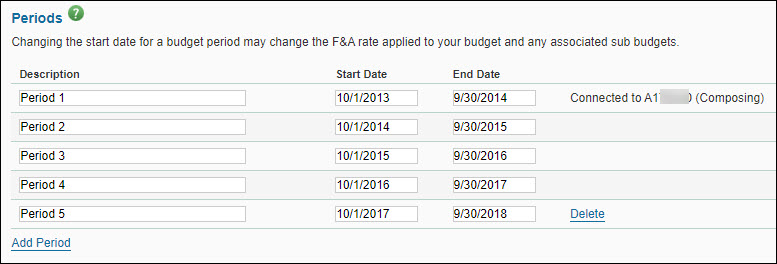
The Periods tab displays the budget’s period values.
Each period has a description, start date, and end date. The systems ensures that the dates are contiguous. This means the start date of the next period is the day after the end date of the preceding period. In other words, there are no gaps of time between periods.
Sub budgets may be included in any budget. Each type of sub budget serves a particular purpose.
Field
Description
Internal UW Budget
Since it inherits all of the parent budget’s UW business rules, benefit rates, and F&A settings, it can be used to break out budgets for separate UW departments, for example.
Fabrication Budget
The data in this sub budget rolls up to a single line on the parent budget under the (06) Equipment category.
Subcontract Budget
The data in this sub budget rolls up to a single line on the parent budget under the (03) Other Contractual Service category.
A subcontract sub budget can also support custom external F&A rates and external benefit rates.
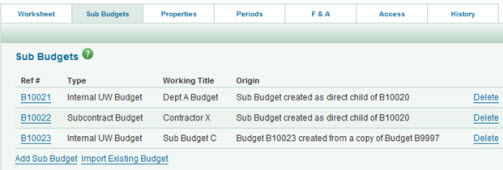
The Sub Budgets tab lists all sub budgets associated with the parent budget.
If there are existing sub budgets, the following information displays:
Field
Description
Ref #
The unique number assigned to the sub budget. Click it to display the budget’s worksheet.
Type
Internal UW Budget, Fabrication Budget, or Subcontract Budget
Working Title
The name of the sub budget.
Origin
Describes the source of this sub budget – either created directly or imported (copied).
A Delete link displays to the far right of each sub budget listed. Click the link to remove the sub budget from the parent budget.
Below the list are two links.
Add Sub Budget: Click this to create a new sub budget.
Import Existing Budget: Click this to search for and select an existing budget to be related to this parent budget. The imported budget will be added as an Internal UW type sub budget.
Another way to access a sub budget is through the list at the bottom of the parent worksheet.
When viewing the worksheet for the main (parent) budget, or a sub budget, you will see a set of icons at the upper right of the sheet. They allow you to make adjustments to what you see on the worksheet, and to perform actions on the worksheet. The set of icons are shown in the following image, and are numbered left to right.
Create a copy of this budget – this feature is no longer available.
Delete this budget – this feature is no longer available
Display Full Screen
These icons allow you to choose how you view the worksheet within the browser window.
The “magnifier with plus” icon (to the left) allows you to expand the worksheet to fill the whole browser window, allowing you to see more of the sheet details, rather than the SAGE and budget tabs.
The “magnifier with minus” icon (to the right) returns you to the standard view. When you’re in full screen mode, you can also use the Close Full Screen link in the upper-left corner of the screen.
Show All Sub-Object Budget Lines
You can use these icons to fully expand all of the line items in your budget.
The “plus” icon expands the worksheet, and displays the sub-object lines you have already entered and the Add buttons for each section.
The “minus” icon contracts the worksheet back to displaying just the object code summary lines.
Print the Budget
This icon displays a printable copy of your budget.
A new browser window will appear with the budget data formatted for printing.
The output includes two different formats of the data: the first is line-by-line for all periods; the second is to help you complete the SR 424 (R&R) Detailed Budget used in Grants.gov submissions.
Export the Budget to Excel
This icon exports your budget as an Excel spreadsheet.
You will be prompted to open Excel.
The output includes two different formats of the data: the first is line-by-line for all periods; the second is to help you complete the SR 424 (R&R) Detailed Budget used in Grants.gov submissions.
The Student Aid (08-00) line item links directly to personnel setup in the (01) Salaries and Wages section of the budget. It may be used for specific personnel sub-object codes (33, 34, 43, 44, 51-54, 91-94).
This page presents the information for all of the periods for the chosen person. The values are from the Salary and Wages section.
The information displayed here is not directly editable.
Quarterly Tuition Rate displays the value for this person, such as: Standard Campus.
Number of Quarters displays the value entered for the particular period when the person was added in the Salary and Wages section.
Increase % (percent) is the percentage rate that applies to the Quarterly Tuition Rate.
Total Tuition is the dollar amount of the tuition.
The Sea Pay line item appears if the Budget includes Sea Pay checkbox is selected on the Properties Tab. Use it to include additional work hours above a standard 40 hour work week when personnel are at sea.
The Sea Pay Calculation accommodates up to an additional 44 hours per week for personnel at sea.
Sea Pay Personnel List and Benefits
Click in any period to open the Sea Pay Personnel List.
Field
Description
Name
Shows the name of the individual or TBD person added, followed by their Title.
Monthly ($)
For salaried personnel, this value is derived from the “Monthly Base Salary” plus any salary inflation rate increases for a period. For hourly personnel, this value is the “Rate/Hour” value plus any salary inflation rate increases for a period multiplied by 173.3 (hours per average month).
Hourly Rate ($)
For salaried personnel, this value is the Monthly value divided by 173.3 (hours per average month). For hourly personnel, this value is the “Rate/Hour” value plus any salary inflation rate increases for a period.
Hours
Enter the value that represents the actual “Sea Pay” hours worked for each period.
This section indicates the specific object, and sub-object, codes that are included in the F&A base being used. Budget values for this period will display for included object codes. The Amount Subject to Base, Base & Rate, and Total F&A values for this period are also displayed.
Use the plus sign (+) to fully expand the list and display all of the sub-object codes. The minus sign (-) will contract the entire list. You can expand, and then contract, an individual object code by clicking on it.