PAS Requisition Entry
Included on this page:
The PAS-Requisition Entry System allows you to enter a purchase requisition
through the campus computer network and send it electronically to the
Purchasing Department.
Use PAS to encumber money against a single budget or multiple budgets for
purchases from vendors outside of the University. You may also use PAS to encumber funds to pay
individuals for costs of travel and for honoraria, and other reimbursements.
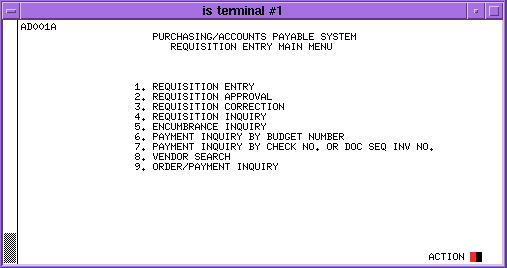
The Requisition Entry Menu appears automatically when you select the
Purchasing System (PAS) from the Administrative Systems Main Menu.
To begin a requisition, request Requisition Entry:
Action: [1] Requisition Entry
[Send]
The Introduction Screen allows you to specify the biennium and primary budget
number to be encumbered.
Note: The Project Cost Accounting codes, Task, Option, and Project may be used to identify
entries on your Budget Activity Report, only if you are authorized to use the Project Cost
Accounting system. If you do not have this authorization, please leave those fields blank.
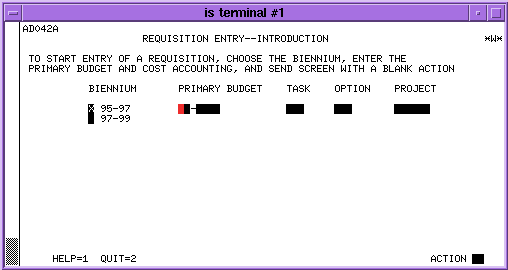
To encumber funds for the next biennium:
[X] in next Biennium box (box appears shortly before biennium change)
Note: Requisitions may be entered for the next biennium only during the time
period specified by the Purchasing and General Accounting offices, which is
just prior to the biennium close.
To initiate a requisition:
"budget number"
[Send]
You must complete entry of this screen before the requisition is assigned a
number. Instructions for entering data into the General Data Screen follow.
Delivery/Dept Contact Information: The delivery address and department contact data may be
set for each of your budget numbers. When the information is set in
advance, requisitions entered on the preset budgets will automatically display the delivery
information.
When the delivery address appears, it may be left as it appears, or typed over
for unusual deliveries.
Address: MandatoryType the address for delivery. Include
department name, UW Building or street address, room number, city, state, and
zip code; type state and zip code in designated boxes.
Box: Mandatory Type the UW box number. If the delivery is to be
to a location without a box number, enter the box number of the ordering
department.
Attn: Optional Type the name of the person who should receive
the shipment, if other than the Department Contact.
Department Contact: Mandatory Type the name of the person in the
department who knows about the requisitionusually the one who enters the
requisitions.
Box: Mandatory Type the UW Mail Box Number of the Contact
Person.
Phone: Mandatory Type the contact person's phone number.
Dates: Optional When using any of the date fields, type six
digits (e.g. 10/28/97). Do not use any alphabetic characters.
Deliver No Later Than: Type the date that the merchandise should
arrive.
No Earlier Than: Type the first date that the delivery would be
accepted. Use only when merchandise cannot arrive before this date without
causing problems (e.g. perishables or furniture for an unfinished room.
Service Begin: Type the date that a service or contract begins.
End: Type the date that a service or contract ends.
Note: If a service contract ends in a different biennium than it
starts, the amount of the requisition will be apportioned between the two
biennia.
Options: Required when applicable Most of the option boxes are
empty and require entry of an "X" only when they apply. The two
options that operate differently are Attachments and Vendors.
Attachments: To send the requisition to a special site for collecting
attachments at Purchasing, type a "Y" in the box; otherwise type an
"N".
Attachments (supporting paperwork) for Purchasing should have the requisition
number written clearly on EACH piece of paper and should be sent to:
Attachments Desk
Purchasing
Box 351115
Note: When preparing a TRAVEL requisition:
- DO NOT enter a "Y" in the Attachment box; enter an
"N".
- Send any travel paperwork to the Purchasing Department addressed as follows:
Travel Office
Purchasing
Box 351117
- Consult the Travel Home Page for complete information on travel procedures
Confirming: Type an "X" in the Confirming box when a person
in your department orders the merchandise directly from the vendor.
Suggested Vendors: To suggest a vendor for the purchase, leave the
"X" in the Suggested Vendor box. To suggest no vendor, space over
the "X". (Once the cursor is in the box, press the spacebar.) More
information on the Vendor Screen follows in this section.
Comments: Type an "X" in the Comments box when you wish to
explain something about the purchase to the buyer or give special payment
instructions to Accounts Payable. When you mark an "X" in this box,
a blank screen for entering comments will appear during the entry process.
More information on the Comments Screen follows in this section.
Sharing: To share the encumbrance between budgets, type an
"X" in the Sharing box, which will display a Sharing Screen later in
the entry process. More information on the Sharing Screen follows in this
section.
Resale: To mark an requisition as resale, type an "X" in the
box. When you type an "X" in the Resale box, the sales tax will not
be added on the Items Screen. General Accounting must approve the budget
numbers used with the Resale option before the system will allow it.
Technical Contact: Optional Type the name of the person who is
most familiar with the merchandise being ordered, if different than the
Department Contact.
Phone: When the Technical Contact is entered, you must type the phone
number for that person.
Estimated Freight: Optional Type the amount of freight estimated
for the entire requisition. The amount entered will be added to the
requisition total. Type the dollar amount without the dollar sign.
The Comments Screen appears only if you entered an "X" in the
COMMENTS? box on the General Data Screen. Type information into the area
provided for the buyer. When the comment includes payment information, be sure
to mark the box for "Payment or Special A/P Instructions" at the
bottom of the screen.
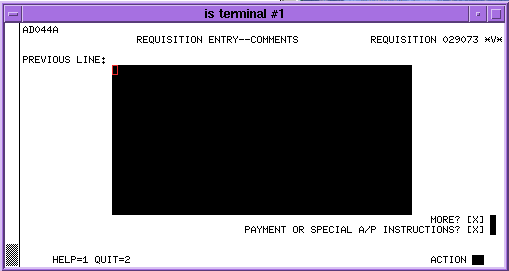
To enter comments:
"text as needed"
To request more comment space
[X] in the MORE? box
To notify Accounts Payable of special comments regarding payment:
[X] in the PAYMENT OR SPECIAL A/P INSTRUCTIONS? box
[Send]
"additional comment" if "X" in MORE? box
[Send]
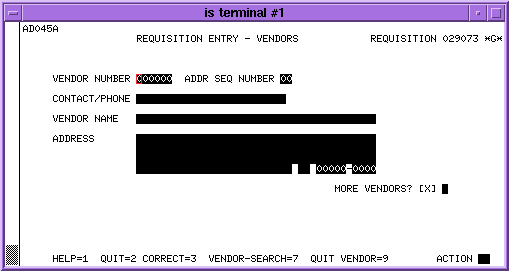
The Vendor Screen appears only if you left the "X" in the SUGGESTED
VENDORS? box on the General Data Screen.
Vendor information can be entered using three different procedures.
Vendor search searching the online vendor file, capturing the
vendor information, and displaying it on the Vendor Screen.
Vendor number entry typing the vendor number and address
sequence number into the fields and sending, thereby displaying the data
retrieved from the online vendor file.
Manual entry typing the vendor information into the fields. This
should be used only if you are absolutely sure the vendor is not in the vendor
file.
Instructions for each of the three entry procedures follow.
Displayed an unnecessary Vendor Screen? This happens if you forget to
space over the SUGGESTED VENDORS? box on the General Data Screen or
inadvertently place an "X" in the MORE VENDORS box on the Vendor
Screen.
To bypass the Vendor Screen:
Action: [9] - Quit Vendor
[Send]
To continue the Quit-Vendor Action:
Action: [9] Continue Quit
[Send] Procedure One Vendor Search
Searching for a vendor number involves leaving the Vendor Screen and going
temporarily into the Vendor Control System, which is another online systgem
that holds vendor data. While in the Vendor Control System, you find the
vendor and select the address for that vendor. Once you have selected the
vendor and address, the computer returns the information to the Requisition
Entry Vendor Screen.
To search for a vendor number:
Action: [7] Vendor Search
[Send]
The Vendor Search Screen appears, as shown below.
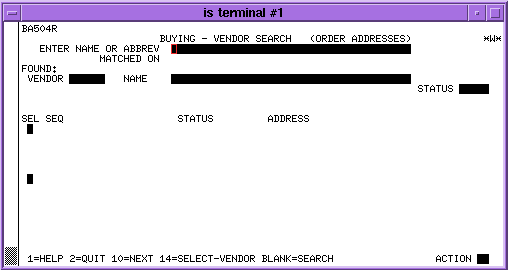
To find the vendor in the Vendor Control File:
"vendor name"
[Send]
As shown in the following screen example, the screen will return with vendor
information on all vendors that match the name entered. Generally at least one
address will appear for each vendor with a valid number.
If there is more than one page of addresses to view, the message
"Additional Addresses" will appear toward the bottom of the screen
and Action 10, Next, will be in the Action Box.
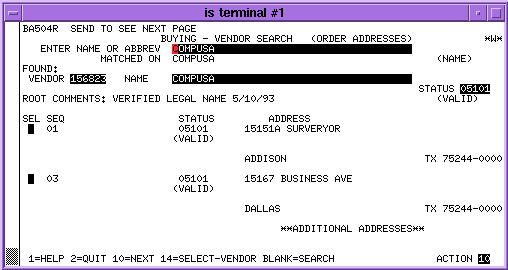
To see the next page of vendor addresses:
[Send]
To search for a different vendor:
"vendor name" over the existing vendor name
[Tab] to the Action Box
[Space] to clear the Action Box
[Send]
To select vendor data to display on the Vendor Screen:
[X] in the SEL box next to the desired "valid" address
Action: [14] Select Vendor
[Send]
Can't find your vendor? If you have paged through all the addresses
without finding the right vendor address, you may need to search using a
different entry for the vendor name. The following tips may help you.
Determining Vendor name:
Find the official vendor name from the following sources, which appear in
order of preference.
- From the "Remit To" portion of the vendor's invoice.
- From the heading of the vendor's invoice.
- From written communication from the vendor, including the response to the
Vendor Information Program questionnaire.
- From a telephone call
Vendors with DBA (doing business as), TA (trading as), and MA (marketing as)
names are on the file using the DBA, TA, or MA name.
Use the full name of the vendor whenever possible.
Format and Punctuation:
- "A" is entered as the first word in a vendor name.
- Ampersands (&) in vendor names are entered with a space before and
after them (e.g. ROSS & ROSS).
- "And" is spelled out only if it is the first word in a vendor
name; otherwise, it is replaced with an ampersand (&). Remember to put a
bland space before and after the ampersand.
- Apostrophes (') in vendor names are disregarded, and are not replaced with
a space.
- Initials within a vendor name are folowed by spaces and no punctuation
(e.g. J R EWING OIL).
- Mc or Mac is followed by a space and the second name (e.g. MC GRAW, MAC
PHERSON).
- Numbers occurring within a vendor name are entered as they appear on the
invoice (e.g., Roman numerals "IV," Arabic Numerals "4,"
or spelled out "NINETEENTH).
- Plus signs (+) in a vendor name are preceded and followed by a space.
- Punctuation such as periods (.), commas (,), slashes (/), and dashes or
hyphens (-), is not entered in a vendor name. Replace each punctuation mark
with a blank space.
- "The" is dropped as the first word in the vendor name.
- Titles of individuals are dropped.
Some vendors simply will not be on the vendor file. In such cases, return to
the Vendor Screen and either type the vendor data manually, or "Quit
Vendor" using Action 9.
To return to the Vendor Screen without a vendor:
Action: [2] Quit
[Send]
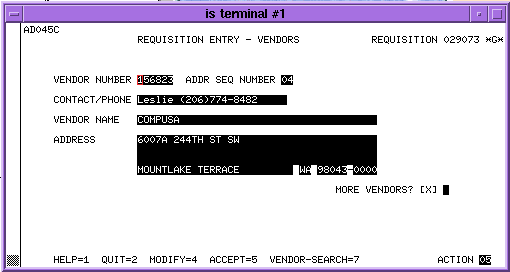
Once you have found and selected the vendor, the vendor's number, name, and
address will appear in the appropriate fields of the Requisition Entry Vendor
Screen as shown below.
Notice that Action 4, Modify, appears in the Action Box. If you have
information to enter in the Contact/Phone field, enter the data before sending
the screen. If you do not have Contact/Phone information, simply press [Send].
If the information is accurate and complete, send the screen again to
"accept" the data as shown.
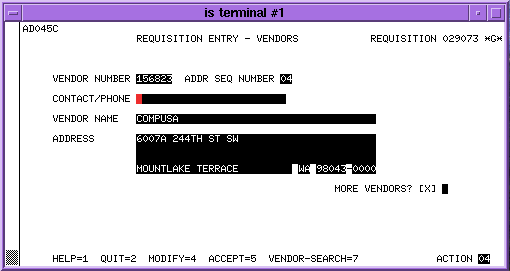
To add vendor contact data:
Action: [4] Modify (appears automatically)
"name and phone number of salesperson" in the Contact/Phone field
[Send]
A screen will return with the modified data and Action 5, Accept in the Action
Box.
To add another vendor screen:
[X] in the MORE? box
[Send Procedure Two Entry with Vendor Number
This method is especially useful for entering frequently used vendors. You
must enter both the vendor number and the address sequence number as they
appear in the Vendor Control File. To find the numbers the first time, use
Vendor Search (Procedure One), and keep them handy for entry by number at a
later time.
To enter a vendor by number:
"vendor number"
"address sequence number"
"name and/or phone number of salesperson" in the Contact/Phone
filed (optional)
[Send]
A screen similar to the following will return with Action 5, Accept, in the
Action Box.
When the screen returns with the vendor address, you may add or modify only
the contact information.
If inaccurate data appear, check the number and try it again. If it still is
not right, you may search for the vendor using Procedure One, or type zeroes
over the numbers and enter the vendor data manually using Procedure Three.
To add or modify the contact information:
[Tab] to the Contact/Phone field
"name and/or phone number of salesperson"
Action: [4] Modify
[Send]
To suggest another vendor:
[X] in the MORE? box
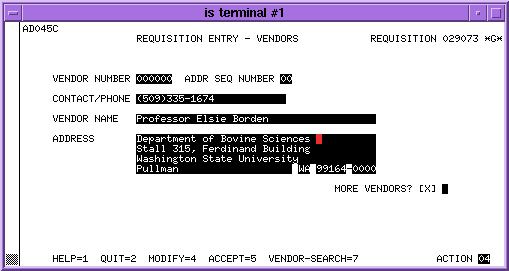
[Send] Procedure Three Manual Entry
Some vendors will not be in the Vendor File. In such cases, type the name of
the vendor, the salesperson if known, the phone number, and mailing address.
This procedure is used frequently for honorarium payments or registration
fees.
To type vendor data manually:
"vendor contact name and/or phone number" Optional
"vendor name"
"vendor address"
[Send]
To suggest another vendor:
[X] in the MORE? box
[Send]
When you send the screen, it will return for modification or acceptance, as
shown below. When you enter the vendor information manually, you may modify
any of the fields, not just the Contact/Phone field.
To modify any data on the screen:
"modified data" over the displayed data
Action: [4] Modify
[Send]
To accept the displayed data:
Action: [5] Accept (appears automatically)
[Send]
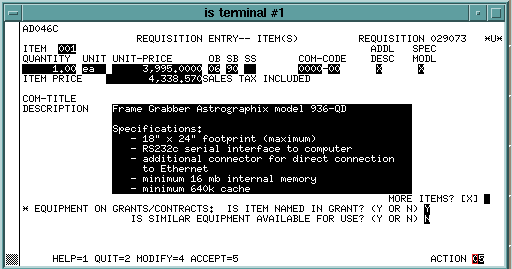
A blank Item Screen will appear for every requisition. You must complete one
Item per screen on the requisition. A requisition may include up to 50 items.
Item entry involves two steps for each completed Item Screen: (1) entering the
item and (2) accepting the data as entered. If you have requested another
screen for additional description or for justifying a specific model of
merchandise, you will enter and accept the Item Screen before the other
screens appear for entry. After those screens relating to the Item Screen are
sent, the next blank Item Screen will appear if you typed an "X" in
the MORE? box.
Each field shown on the above screen is described in the order of entry. Some
fields display computer-generated information, some fields require entry,
others require entry only in special circumstances, and some are entirely
optional. The fields are:
Item: System generated Do not type in this field during
requisition entry. This is the number of the item on the requisition.
Quantity: Mandatory Type the number of item units to be ordered
in the Quantity field. You may use decimals to the hundredth position when
dealing with partial units (e.g. 0.15 liter of plasma). Remember to use
numerical "0" (zero) or "1" rather than alphabetical
"O"s or "I"s.
Unit: Mandatory Type the unit of measurement in the Unit field
(e.g. EA, PKG).
Unit-Price: Mandatory Type the dollar amount of each unit being
requested in the Unit Price field. Do not include sales tax. Unit Price
accommodates up to 4-place decimals (e.g. 1.7285) or a zero for no-charge
items.
OB: Mandatory Type the object code.
SB: Mandatory Type the subobject code.
SS: The subobject code is not used.
Com-Code: The commodity code is not used.
Addl Desc: Optional Type an "X" in the Addl Desc box
to display an additional screen for item description.
Spec Modl: Required when applicable Type an "X" in the
Spec Modl box to display a blank screen for typing the specific model
justification statement. A statement is required when only a particular model
will be suitable for use.
Description: Mandatory Type the description for the item
requested in the Description field. Begin with general information, adding
specifics such as catalog or model numbers. (Only the first part of the first
line will appear in other inquiries.)
More Items?: Required when applicable Type an "X" in
the box to display another blank Item Screen. The "X" may be added
at any time before sending Action 5, Accept.
Equipment on Grants/Contracts:
Is Item Named in Grant? Required when applicable Type a
"Y" in the Item Named in Grant box when the requested equipment is
specified in the grant or type an "N" when the requested equipment
is not specified in the grant.
Is Similar Equipment Available for Use? Required when applicable
Type an "N" in the box when the requested equipment exceeds $1200,
and your department has no other similar equipment available for the job.
Otherwise, type a "Y" in the box.
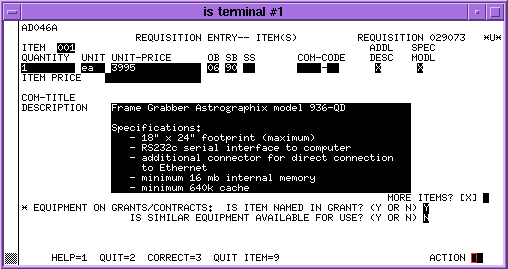
An illustration of a typical entry on the Item Screen follows:
Quit-Item
Quit Item, Action 9, bypasses an Item Screen displayed unintentionally by
displaying the next screen for requisition entry. Before using Quit Item, you
must enter at least one item on the requisition.
The Quit-Item process has two steps, Quit-Item and Continue-Quit. When
Continue-Quit is available, you may choose to resume item entry instead.
To quit entering items:
Action: [9] Quit Item
[Send]
A screen displaying actions for the second step in the process will appear.
To resume item entry:
Action: [10] Resume Item Entry
To confirm the Quit-Item action:
Action: [9] Continue Quit
Note: Do not confuse Quit-Item (Action 9) with Quit (Action 2). The difference
is that Action 2, Quit, displays the Requisition Entry Menu and leaves the
requisition in an incomplete status, expecting more items. Action 9,
Quit-Item, displays the next screen in your requisition and allows you to
finish entry.
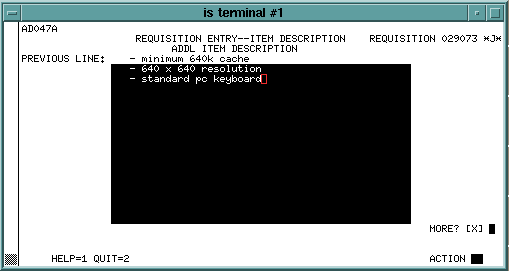
The additional Item Description Screen appears only when you enter an
"X" in the Addl Desc box on the Item Screen. The description may be
as long as you like. Once the screen appears, you may continue typing the item
description. Notice that the last line typed on the previous description
screen appears on the first line.
To include additional item description:
"further item description"
To request more space:
"X" in the MORE? box
[Send]
The Specific Model Justification Screen appears only when you enter an
"X" in the SPEC MODL box on the Item Screen. A specific model
justification statement is required when the piece of equipment described in
the item description cannot be substituted by another similar piece of
equipment.
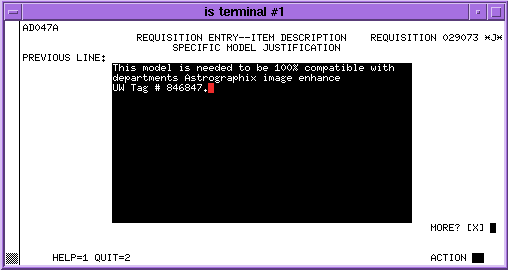
To include a specific model justification statement:
"justification statement"
To request more space:
"X" in the MORE? box
[Send]
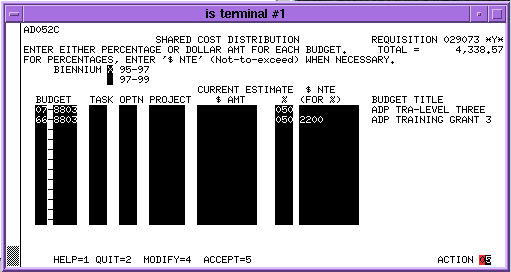
The Shared Cost Distribution Screen appears only when you type an
"X" in the SHARING box on the General Data Screen. On this screen,
you add other budget numbers to share the cost of the requisitioneach
budget number must be listed only once.
One requisition may encumber as many as 12 budgets. You may share the cost by
percentage or dollar amount; select one convention. After entering the budget
number(s) and the amount or percentage for each budget number, you must
"accept" the entry in much the same way as you "accept' item
information.
When the screen first appears, as shown below, it will display the first
budget number and the budget title.
You must select one sharing conventioneither percentage or dollar
amount.
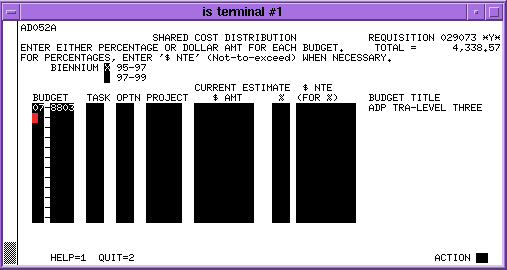
When sharing by percentage, enter only whole numbers (e.g. 51 and not
50.5). Do not type the percentage sign. Also, the Not-To-Exceed (NTE) Limits
are optional. When sharing by percentage, you may type a
"not-to-exceed" amount for a budget. Central offices are not bound
by NTE Limits. The amounts are entered as a notice but are not system
enforced.
When sharing by dollar amount, you may enter either the exact or the rounded
dollar amounts. If you enter rounded amounts, the computer will adjust the
first budget to balance with the requisition total. (It will add or subtract
up to 10 percent of the requisition total from the primary budget.)
Accounting adjustments for requisitions shared by dollar amount will be
prorated between the primary budget (the first budget listed) and the others
proportionate to the amounts you enter for these budgets. Consequently, you
need not enter "Not-To-Exceed" amounts when sharing by dollar
amount.
To encumber more than one budget:
"additional budget numbers"
"percentage or dollar amount for each budget"
"not-to-exceed amount" (Optional) for sharing by percentage amount
[Send]
When you have shared cost by entering rounded dollar amounts, the screen will
appear with an error message at the top and a notation at the bottom stating
that the prime budget has been adjusted to total the exact requisition amount.
This is an additional step that does not occur when the exact dollar amount is
entered.
To change the adjusted amounts:
"correct amounts" over the displayed amounts
[Send]
To leave the adjusted amounts:
[Send]
The screen will return, as shown below, with the budget title for the budget
numbers and action codes for either modifying or accepting the information.
When the Accept Action appears, the Modify Action also appears, allowing you
to change incorrect information by typing over it. If you change it at this
point, the screen will return with the corrected data for you to accept
To modify INACCURATE data:
Action: [4] Modify
"the necessary correction"
[Send]
To accept the displayed data:
Action: [5] Accept (appears automatically)
[Send]
If an additional budget you have added is not in your organization code, the
screen will remind you to fill out a PR-3
form and send it to the department whose budget you have
charged. That department must sign the form and send it to the Attachments
Desk (Box 351115) in Purchasing. Your requisition will automatically be marked
as "ATTACHMENTS = Y."
The Sole Source Query Screen appears if you suggest only one vendor AND the
requisition exceeds a dollar amount set by State purchasing policies. This
amount is currently $2000 for computer equipment and $3,000 for other
items.
The screen will appear if the order exceeds $3,000.
You may enter an online sole source justification statement or send a paper
statement as an attachment to the requisition. Whichever method you use to
send the statement, it must meet the guidelines for sole source purchases set
by the Purchasing Department. 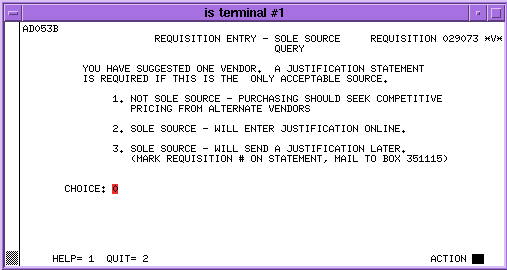
Choices:
"1" allows you to continue entry without requesting a sole
source. (Purchasing will seek competitive bids.)
"2" displays a blank screen for entering the online
justification statement. After sending the filled-in screen, the Recap Screen
appears.
"3" places a "Y" in the Attachment box in the
General Data Screen and displays the Recap Screen. When selecting
"3," be sure to mail the justification statement to the Attachments
Desk, Purchasing Department, Box 351115. (Remember to write the requisition
number on the statement.)
To enter your choice:
[1], [2], or [3] in the Choice Box.
[Send]
Sole Source Justification Screen
The Sole Source Justification Screen appears only if you entered "2"
in the CHOICE box on the Sole Source Query Screen. You simply type the
information into the highlighted spaces provided.
The person preparing the statement is legally responsible for providing
accurate and true information. The person entering the requisition is not
necessarily the person preparing the statement.
To enter the necessary information:
"name of person preparing the statement"
"preparer's telephone number"
"sole source justification statement
To request more space for the statement:
[X] in MORE? box
[Send]
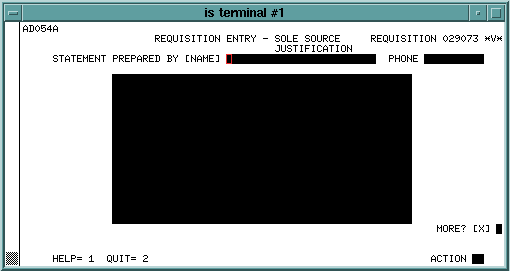
When the statement is complete:
[Send]
The Requisition Recap Screen is the final screen in the entry process. You
need not enter any information, but you should review the summarized data
before encumbering the requisition. All requisitions must be encumbered before
they proceed to the review and purchasing procedures.

Notice that the last line displays budget information and notations for
attachments and confirming. This requisition would not be confirming, but the
notation is displayed for illustration.
When the Recap Screen appears, you may perform any of the actions listed
below, which are described further on the following pages.
- Quit leave the requisition in an incomplete status and
return to the Requisition Entry Menu.
- Correct correct information on the requisition.
- Purge purge (delete) the requisition.
- Inquire see summarized or detailed data for the requisition.
- Encumber encumber funds in the budget(s) for the purchase.
Quit
Selecting Quit, Action 2, displays the Requisition Entry Menu and leaves the
requisition in an incomplete status. The requisition will then remain
incomplete in the status "perform Encumbrance" until it is
encumbered or purged.
To quit a requisition:
Action: [2] Quit
[Send]
Correct
Selecting Correct, Action 3, from any of the Requisition Entry screens
displays the Corrections Menu. From there, select the action for the screen
requiring corrections. See the Web page on Corrections
for directions for correcting a requisition.
To make a correction to the requisition:
Action: [3] Correct
[Send]
Follow the corrections procedure.
To return to the Requisition Recap Screen:
Action: [2] Quit
[Send]
Once you send most corrected screens, the Corrections Menu returns
automatically. Unlike the others, the Vendor and Item Screens require you to
quit to display the Corrections Menu. From the Corrections Menu, quit to
return to the Recap Screen.
Purge
The Purge process requires two steps, Purge and Continue Purge. Once a
requisition is purged, the number goes on record as purged and will not be
used again.
To purge a requisition:
Action: [4] Quit
[Send]
To discontinue the purge:
Action: [0] Quit Purge
[Send]
To complete the purge:
Action: [9] Continue Purge
[Send]
Inquire
Selecting Inquire, Action 5, from the Recap Screen displays the Requisition
Inquiry General Data Screen. From there, you may see detail screens for the
requisition by selecting various actions. See the Web page in Inquiry
for more information about inquiries.
To inquire into requisition detail:
Action: [5] Inquire
[Send]
To return to the Requisition Recap Screen:
Action: [2] Quit
[Send]
You may need to quit several times to return to the Recap Screen, depending on
which screen you are viewing.
Encumber
Action 6, Encumber, appears in the action box automatically. By pressing the
Send key, you encumber funds in the budget for the amount of the requisition
and display the Introduction Screen for entry of the next requisition. Once
the requisition is encumbered, you may not correct it, but you may view the
detail by going into Requisition Inquiry.
To encumber a requisition:
[Send]
Other Topics in this Guide:
| 