Requisition Corrections
Included on this page:
Before making corrections, you should check the status of the online
requisition by going into Requisition Inquiry (see PAS Inquiries). To be
available for corrections, a requisition must be either "Incomplete"
or in the status "Make Corrections, Then Reencumber." You may make
corrections
- while you are entering the requisition,
- after you have "quit" from an incomplete requisition,
- after a requisition has been rejected by the next reviewer.
You may modify a requisition at various points during the requisition entry
process. Several screens within the Requisition Entry System offer a Correct
Action Code that will take you directly to the Corrections Menu allow you to
make the necessary changes, and return you to the same screen within the
Requisition Entry System.
The Requisition Recap Screen, the last screen in the entry process, includes
the Correct Action, so you may make any last-minute corrections before encumbrance.
You may find it necessary to stop entering a requisition before completing
the entry process. To do so, write down the requisition number,
"quit" from the screen and later finish by going into
Corrections and selecting Action Code 10, Resume an Incomplete.
Online requisitions with any of the following status codes may be easily
finished or changed through Resume an Incomplete in Corrections:
- Enter Comments
- Enter Suggested Vendor
- Enter Items
- Check Sole Sourcing Perform Encumbrance
Once a requisition is encumbered, you may correct it only if the reviewer at
the next level rejects it. After the reviewer rejects it, the requisition
returns to the point of origination so that you can make corrections. Once
rejected, the requisition will be in the status "Make Corrections, Then
Reencumber."
If the requisition needing corrections is in the status:
"Perform Requisition Approval," the person in your department
with signature authority must reject the requisition before you can access it
for corrections (see Requisition Approval).
"Obtain Grant & Contract Approval," call the Grant and
Contract Accounting Office. (3-8454)
"Obtain Equipment Inventory Approval," call the Equipment
Inventory Office. (3-4663)
"Awaiting Attachments at Purchasing," call the
PurchasingRequisition Entry Office. (3-0616)
Once the central office reviewer rejects the requisition, it will appear in
the originating department ready for corrections. The reviewer who rejects the
requisition must enter the reason for rejection, which may be viewed in the
Requisition InquiryComments Screen. (See the PAS
Inquiries page for further information.)
The following sections describe each type of correction in detail.
The steps below pertain only to initiating the correction process from the
Requisition Entry Main Menu. If you enter corrections during requisition entry
by using the Correct Action, you need only refer to the sections pertaining to
the individual screens.
Sign on to the PAS System as directed in the Introduction/Quick Reference
section of this guide.
The Requisition Entry Main Menu will appear as shown below.
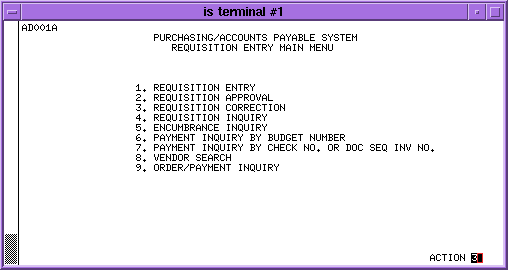
To request the Requisition Correction Menu:
Action: [3] Requisition Correction
[Send]
You can correct or add the following screens:
General Data
Comments
Vendors
Items
Sole Source Justification
Recap and Encumber
or, you can resume an incomplete
requisition.
On the General Data Screen you may correct the following information:
- Delivery Address
- Mailstops
- Department Contact
- Telephone Numbers
- Dates
- Attachments
- Confirming
- Technical Contact
- Total Estimated Freight.
To change comments, vendors, or budget sharing information, you must go
directly to the Comments Screen, Vendors Screen, or the Shared Cost
Distribution Screen. They are Actions 4, 5, and 6 respectively on the
Corrections Menu.

To correct a General Data Screen from the Corrections Menu:
"requisition number" in the Requisition field
Action: [3] General Data
[Send] 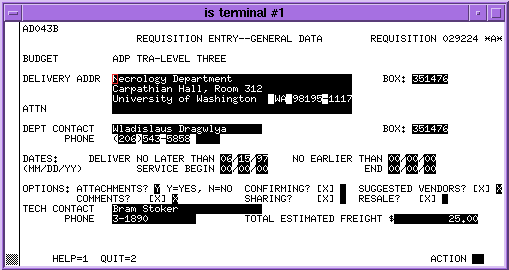
To correct fields on the General Data Screen:
"revisions" type over the displayed data with
correct information
[Send]
The Corrections Menu will return.
You may change or add comments that would be helpful to the assigned buyer or
to Accounts Payable
To add comments or to correct an existing Comments Screen:
"requisition number" in the Requisition Field
Action: [4] Comments
[Send]
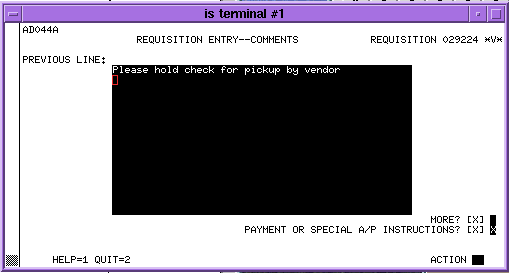
To correct the comments:
"revised or additional comment"
To correct or add more comments than will fit on the first screen:
[X] in More? field
[Send]
"additional comments"
To notify Accounts Payable of comments regarding payment:
[X] in the Payment or Special A/P Instructions? field
To complete the Comment Correction:
[Send]
The Corrections Menu will return.
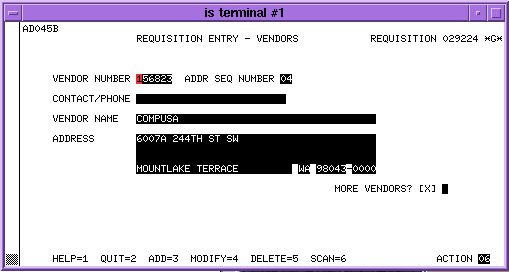
The Requisition Entry Vendors Screen in Corrections allows you to:
- add another vendor,
- delete a vendor,
- modify the contact information, or
- modify any vendor data entered manually (if vendor number has not beenused).
To change a vendor when using vendor numbers, you must first delete the old
vendor and then add a new vendor.
To make corrections to the Vendors Screen:
"requisition number" in Requisition field
Action: [5] Vendors
[Send] Scanning the Vendors
The first vendor you entered will appear automatically when you enter Vendor
Corrections. You may "Scan" through all vendor screens in the order
they were entered.
To scan through all vendors suggested originally:
Action: [6] Scan
[Send]
Action 6 will remain in your Action Box
To continue scanning:
[Send]
When you send the last Vendor Screen, the Scan will restart with the first vendor. Adding
a Vendor
You may add vendor information either by typing all the data manually or by
entering the vendor number, address sequence number, and contact. Whenever the
"Add = 3" action is available at the bottom of the Vendor Screen,
you may add a vendor.
To add a Vendor:
Action: [3] Add
[Send]
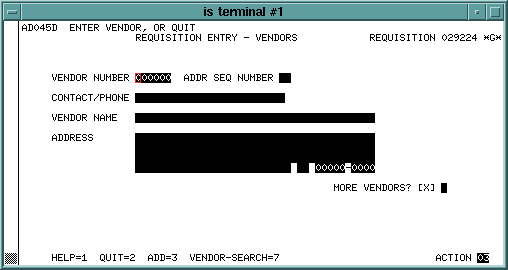
A blank Vendor Screen will return with "Enter Vendor, or Quit" in
the top left of the screen. You may then enter the vendor data manually or by
vendor number. If the vendor number is not known, do the Vendor Search process
before adding the vendor.
To enter the vendor data manually:
"contact name and phone number
"vendor name"
"address"
[Send]
To accept vendor information as correct:
Action: [5] Accept (appears automatically)
[Send]
To search for a vendor number:
See Requisition Entry Vendor Search instructions
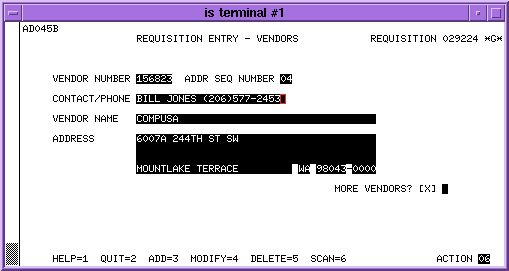
To enter the vendor data by number
"vendor number"
"address sequence number"
"contact/phone" for vendor representative
[Send]

To accept the displayed data:
Action: [5] Accept (appears automatically)
[Send]
The first Requisition Entry Vendors Screen will return with the message
"Vendor Successfully Entered" in the upper left corner. From this
point, you may select any of the actions available at the bottom of the
screen.
Note: If a requisition is incomplete, with no items entered, and a vendor is
added, the requisition will continue with the Requisition Entry Item
Screen once the vendor is accepted. Deleting a Vendor
If the Vendor Screen to be deleted does not appear on your screen, use the
Scan action to find it, and then proceed with the directions below.

To delete a Vendor once it appears on the screen:
Action: [5] Delete
[Send]
A blank Vendor Screen will return with the message "Vendor Successfully
Deleted" in the upper left corner of the screen. From this point, you may
select any of the actions available at the bottom of the screen.
To return to the Corrections Menu:
Action: [2] Quit
[Send] Modifying the Vendor Screen
Modify can be used to make changes to the contact/phone information on the
Vendor Screen, or to change the vendor name and address for a vendor entered without
a vendor number. To change a vendor that was entered using a vendor
number, you must first deleted the existing Vendor Screen and then add a new
vendor.
To modify a Vendor Screen that does not have a vendor number:
"revisions" over the displayed text
Action: [4] Modify
[Send]
To accept the modifications as correct:
Action: [5] Accept (appears automatically)
[Send]
The corrected screen will return with the message "Vendor Modified"
in the upper left corner of the screen. From this point, you may select any of
the available actions at the bottom of the screen.
To return to the Corrections Menu:
Action: [2] Quit
[Send]
You may change, add, or delete budget number(s) and distribution amounts that
were initially entered on a requisition
To add, change, or delete budget numbers:
"requisition number" in the Requisition field
Action: [6] Budgets
[Send]
The steps for correcting the budget information and/or distribution follow. 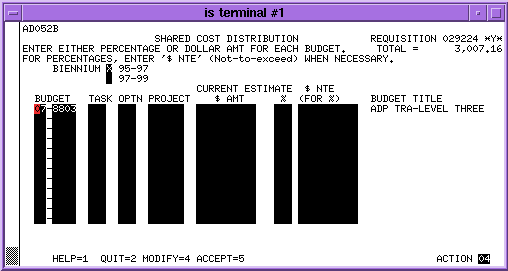
Step One: Add, change, or delete budget number(s)
To add a budget number:
[] to first open budget number field]
"additional budget number"
To change a budget number:
"different budget number" over the number to
replace
To delete a budget number:
[¯] to the budget number to be deleted
"00 0000" over the existing budget number Step Two:
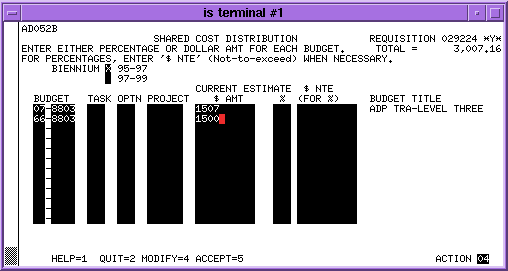
Distribute the cost between budgets.
You may share the cost by percentage or dollar amount; select one convention.
After entering the budget numbers and the amount or percentage for each budget
number, you must "accept" the entry in much the same way as you
"accept" item information.Select one sharing
conventioneither percentage or dollar amount.
When sharing by percentage, enter only whole numbers (e.g. 51 and not
50.5). Do not type the percentage sign. Also, the Not-to-exceed (NTE) Limits
are optional. When sharing by percentage, you may type a
"Not-to-exceed" amount for a budget. Central offices are not bound
by "Not-to-exceed" amounts entered. These act as a reminder but are
not system-enforced limits. When using the NTE Limits, be sure to leave at
least one NTE Limit field blank for each requisition.
When sharing by dollar amount, you may enter either the exact dollar or
the rounded dollar amounts. If the rounded amount is entered, the computer
will adjust the first, primary, budget listed to balance with the requisition
total. (It will add or subtract up to 10 percent of the requisition total from
the primary budget.) The screen will return with the adjusted dollar amounts
with an action for modifying the information before accepting.
Accounting adjustments for requisition shared by dollar amount will be
prorated between the primary budget (the first budget listed) and the others
proportionate to the amounts you enter for these budgets. Consequently, you
need not enter "Not-to-exceed" amounts when sharing by dollar
amount.
To encumber more than one budget:
[Tab] to % or $ AMT column
"percentage or dollar amount for each budget"
[Send]
The screen will return, as shown below, with the budget title for the budget
numbers and action codes for either modifying or accepting the information.
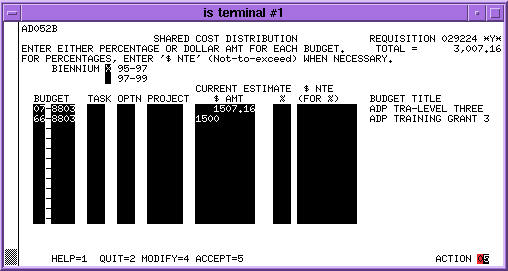
To modify inaccurate data:
Action: [4] Modify
"the necessary correction
[Send]
To accept the displayed information:
Action [5] Accept (appears automatically)
[Send]
If an additional budget you have added is not in your organization code, the
screen will remind you to fill out a PR-3 form (which you can copy from your
Operations Manual) and send it to the department whose budget you have
charged. That department must sign the form and send it to the Attachments
Desk (Box 351115) in Purchasing. Your requisition will automatically be marked
as "ATTACHMENTS = Y."
You may change nearly all of the fields that appear on the Items Screen. The
two that will not allow revisions are the Item field and the Item Price field.
The Item field is the number of the item on the requisition, which is assigned
automatically.
The Item Price field is the calculated cost for the item. Whenever you change
information on the Items Screen that impacts the Item Price field, the system
recalculates the new amount and displays it during the "accept" process.
To correct item information:
"requisition number" in the Requisition field
Action [7] Items
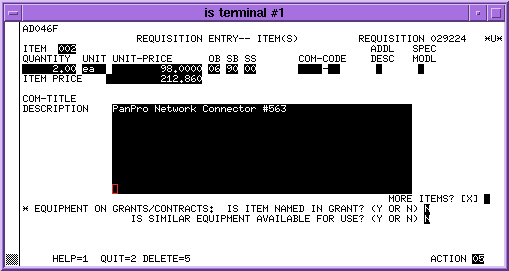
[Send] Locating the Right Item Screen
When you request Items from the Corrections Menu, a blank Item Screen
appears. Since the information for each item appears on a separate screen, you
need to find and display the item information that you wish to modify or
delete.
You may locate a particular screen if item data in either of two ways
selecting the item or scanning through the screens until you find the right
item.
- Selecting the Item. If you know the item number, this process is
faster. Using this method, you enter both the item number (e.g. 001, 011, 050)
to select the screen and the Action Code to prepare the system in the same
step. When the Item Screen to be corrected appears, you change the data and
send the screen again to complete the action.
- Scanning. When you do not know the item number, send the screen
with Action 6, Scan, which displays the first item. From there, you send the
screen with Action 6 each time you want to see the next Item Screen.
When you have seen all the Item Screens for a requisition, a message stating
"End of Items for this Req No." will appear in the top left corner
of the screen. To loop around and start at the first Item Screen, send Action
6 once more.
Once you display the appropriate Item Screen, modifying or deleting it takes
one step mote than when you "select the item." That is, you must
first before making any changes enter the Modify or
Delete Action Code and send the screen. When the screen returns, you
may enter your changes or delete the screen.
The system ignores any data changes you make before you send the Modify or
Delete Action Code. This keeps you from accidentally changing or an item that
you just wanted to see using Scan.
Modifying an Item

Step One: Locate and display the appropriate Item Screen using either method.
With Scan:
Action: [6] Scan (repeat as necessary)
[Send]
Action: [4] Modify
[Send]
With Item:
"item" (e.g. 001)
Action: [4] Modify
[Send]
The Item Screen will return with a "4" in the Action Box, ready to
be modified. 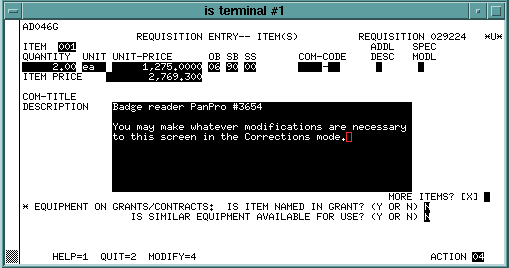
Step Two: Modify and accept entry.
"modifications to data"
[Send]
If the modification is inaccurate:
"revision" over the displayed text
Action: [4] Modify
[Send]
To accept the item information as displayed:
[Send]
The screen will return with the message "Modify Completed." From
this point, you may select any action displayed at the bottom of the screen. Deleting
an Item

Step One: Locate and display the appropriate Item Screen using either of
the following methods.
With Scan:
Action: [6] Scan (repeat as necessary)
[Send]
Action: [5] Delete
[Send]
With Item:
"item" (e.g. 001)
Action: [5] Delete
[Send]
The Item Screen will return with a "5" in the Action Box, ready to
be deleted.
To discontinue the deletion:
Action: [2] Quit
[Send]
The screen will return with the message "Deletion Not Performed."
Step Two: Delete the Item
Action: [5] Delete (appears automatically)
[Send]
A blank screen will return with the message "Deletion Item No XXX
Completed." From this point you may select any action displayed. Adding
an Item
When adding an item, enter the item information as you would during the
requisition entry process. For entry instructions, go to the Requisition Entry
section of this guide.
You must be on a blank Item Screen to add a new item to a requisition. You
will have a blank screen when you enter Item Corrections from the Corrections
Menu, or you may scan through your items until a blank screen is returned.
To add an item on a blank Item Screen:
"data for new item"
Action" [3] Add
[Send]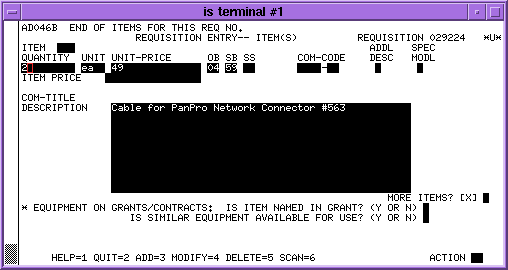
If the data are inaccurate:
"revision" over displayed text
Action: [4] Modify
[Send]
To accept the new item data:
Verify the item information as displayed.
Action: [5] Accept (appears automatically)
[Send]
A blank Item Screen will return with the message "Add Item(s)
Completed" in the top left corner of the screen. At that point, you may
select any action displayed at the bottom of the screen.
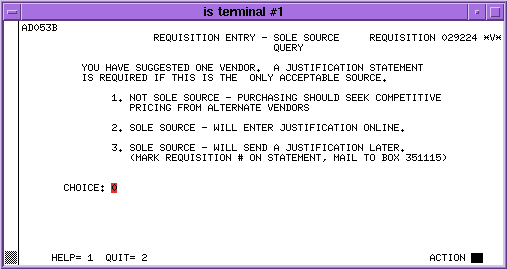
The Sole Source Screen appears during requisition entry if the purchase amount
exceeds a set dollar amount and you suggested only one vendor. You may
make several types of changes to the Sole Source Screen. You may:
- Change the Choice field to the most applicable choice on the screen.
- Change the existing justification statement.
- Add an online statement if you change your choice to "2" on the
Sole Source Query Screen.
To request the Sole Source Justification Screen:
"requisition number" in Requisition field
Action: [8] Sole Source Justification
[Send]
If you entered Choice "2" previously, you entered a justification
statement online, so the "2" will appear automatically in the Choice
field.
To change your choice
[1], [2], or [3] in the Choice field
[Send]
When you choose "1" or "3," you need not enter further
information online. When choosing "3," however, you must mail a
paper justification statement as an attachment to Box 351115.
When you choose "2," you must change the existing statement or add a
new one. The Sole Source Justification Screen will appear automatically when
you send the screen with a "2" in the Choice Box.
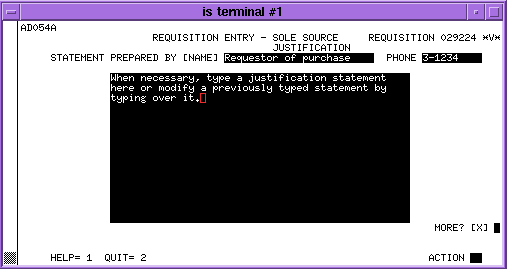
To add or change the Sole Source Justification Statement:
"new or revised statement"
[Send}
The Corrections Menu will return.
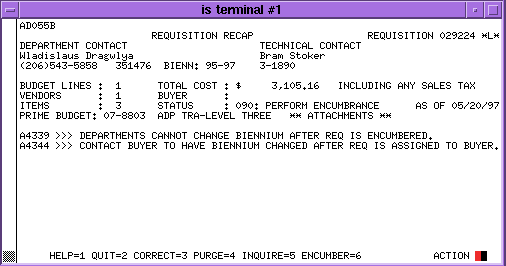
Once you correct a requisition, you must encumber the requisition again before
it can progress through the system. The Recap Screen allows you to encumber a
requisition, inquire into requisition detail, make additional corrections,
and/or purge a requisition.
To request Requisition Recap Screen
"requisition number" in the Requisition field
Action: [9] Recap and Encumber
[Send]
When the Recap Screen appears, you may perform any of the actions listed
below, which are described further on the following pages.
- Quit leave the requisition in an incomplete status and
return to the Corrections Menu.
- Correct correct information on the requisition.
- Purge purge (delete) the requisition.
- Inquire see summarized or detailed data for the requisition.
- Encumber encumber funds in the budget(s) for the purchase.
Quit
Selecting Quit, Action 2, displays the Corrections Menu and leaves the
requisition in an incomplete status. The requisition will then remain
incomplete in the status "Perform Encumbrance" until it is
encumbered or purged.
To quit from the Recap Screen:
Action: [2] Quit
[Send]
Correct
Selecting Correct, Action 3, displays the Corrections Menu. From there, select
the action for the screen requiring corrections. (Directions for correcting
requisition data may be found in this section of this guide.
To make a correction to the requisition:
Action: [3] Correct
[Send]
To return to the Requisition Recap Screen:
Action: [9] Recap and Encumber
[Send]
Purge
The purge process requires two steps, Purge and Continue Purge. Once a
requisition is purged, the number goes on record as purged and will not be
used again.
To purge a requisition:
Action: [4] Purge
[Send]
To discontinue the Purge action:
Action: [0] Quit Purge
[Send]
To continue Purge:
Action: [9] Continue Purge
[Send]
The Requisition Entry Correction Screen will return. At this point, you
may correct another online requisition or quit.
Inquire
Selecting Inquire, Action 5, from the Recap Screen displays the Requisition
Inquiry General Data Screen. From there, you may see detail screens for the
requisition by selecting various actions. (For more information, see Requisition
Inquiry in the Pas Inquiries section of this guide.)
To see requisition detail:
Action: [5] Inquire
[Send]
To return to the Requisition Recap Screen from Requisition Inquiry:
Action: [2] Quit
[Send]
Encumber
Action 6, Encumber, appears in the Action Box automatically when you use
Resume an Incomplete (Action 10) to call up the Recap and Encumber Screen. By
pressing the Send key, you encumber funds in the budget for the amount of the
requisition and display the Introduction Screen for the entry of the next
requisition. Once the requisition is encumbered, you may not correct it, but
you may view the detail by going into Requisition Inquiry.
If you use Recap and Encumber, Action 9 from the Corrections Menu, to call up
the Requisition Recap Screen, the Action Code box will be blank and you will
return to the Corrections Menu after you Encumber, Purge, or Quit the
requisition.
To encumber the requisition:
Action: [6] Encumber
[Send]
The Corrections or Introduction Screen will appear.
You may continue a requisition where you left off during data entry by using
Resume an Incomplete in Corrections. When you "resume" requisition
entry, you leave the Corrections mode and go into the Requisition Entry
System. "Resume an Incomplete" takes you back to the last incomplete
screen on your unfinished requisition.
To resume entry of an incomplete requisition:
"requisition number" in the Requisition field
Action: [10] Resume an Incomplete
[Send]
The first incomplete screen on the unfinished requisition will appear. When it
does, you are in Requisition Entry, not Corrections. Finish the requisition as
you would the first time around. For data entry instructions, turn to the Requisition
Entry section of this guide.
Other Topics in this Guide:
| 