There are a number of ways to move from page to page within your eGC1 and to save the data you have entered.
Breadcrumbs

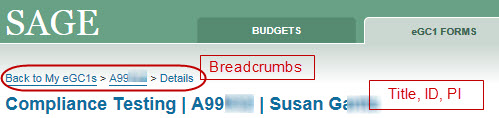
Below the main tabs in SAGE at the left side of the page is a breadcrumb trail which you can use to return to your My eCG1s tasklist. When an item is open the breadcrumb reads “Back to My eGC1s” followed by the item number (for example, A999999), and then the name of the page you are on. Selecting the item number returns you to the Details page which is the page you see when you first open an eGC1.
Below the breadcrumb is the page heading made up of the eGC1’s Short Title, ID, and the name of the PI, separated by the vertical bar character. This appears on every page as a quick reference.
Action Bar Icons
On the right side of the page, just below the heading is a set of icons that allow you to do a number of actions. These are described in order from left to right.
- Previous Page: a straight left-pointing arrow moves you to the prior page on the left navigation menu
- Next Page: a right-pointing arrow moves you to the next page on the left navigation menu
- Save Page: a diskette icon which saves a copy of the current values in the eGC1 to the database
- Reset Form: a curved, left-pointing arrow which clears any un-saved values from the page
- Create a copy of this eGC1: a double-page icon which opens a new eGC1 (after confirmation pop-up) that is a partial copy of the original (see the Copy an Existing eGC1 article)
- Delete this eGC1: a trash can, that appears when the eGC1 status allows, and lets you Delete an eGC1
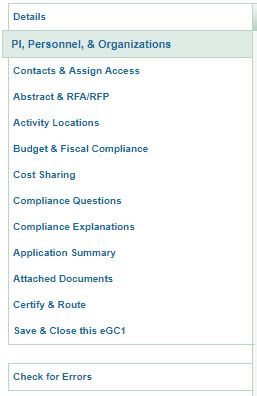
Left Navigation Menu
When you are viewing an eGC1, a navigation menu appears on the left side of the window. It lists all of the pages that are part of the eGC1, and includes links to Save & Close the eGC1 and to Check for Errors. You can click on any page link to move to that page. The page you are currently viewing will be highlighted in the menu. In this example, the PI & Personnel page is highlighted.

If your application is in Approved, Awarded, or Denied by Sponsor status, then an additional “View Funding Status” link displays. Clicking this link will take you to the MyResearch Funding Status page for the application. Note: As of July 6, Funding Status and Non-Award Agreement data may be out of sync with SAGE and Workday until MyResearch is remediated. Please use SAGE to review eGC1 and award status until further notice.
Under the appropriate conditions, one of two additional links will appear: Permanently Withdrawn or Denied by Sponsor. See the linked articles for details.
In the footer of an eGC1 page, there is a Previous link and either a Continue or Next button (depending on the page you are viewing). Just like the arrow icons in the “action bar” clicking Previous will move you to the prior page in the left navigation menu. Clicking the Continue or Next button will move you to the following page.
Closing an eGC1
In order not to lock out a colleague who may also need to work on an eGC1, you should always exit an item using SAGE links.
You have a few options for closing an eCG1:
- Use the Save & Close this eGC1 link in the left navigation menu
- Use the Back to My eGC1s breadcrumb
- Click on the eGC1 FORMS tab
Each of these methods will save any changes that were made, and release the item so that another person would be able to edit it.
Saving eGC1 Data
The data values in your eGC1 are saved whenever you do any of the following:
- Click the Save icon in the action bar
- Navigate to a different page of your eGC1
- by using the Next or Previous arrows in the action bar
- by using the button/link in the footer of a page
- by clicking on a different page link on the left navigation menu
- Click the Save and Close this eGC1 link from the left navigation menu
- Click the Back to My eGC1s breadcrumb
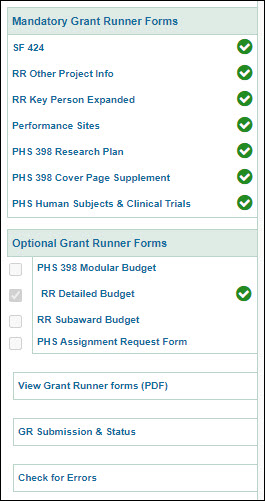
When you are working in a Grant Runner application, the left navigation menu will display additional links.
The first section is labeled Mandatory Grant Runner Forms. Select any link in this section to display the form.
The second section is labeled Optional Grant Runner Forms. Each link in this section is preceded by a checkbox. To access one of these form, check the box first, then select the link.
The View Grant Runner forms (PDF) link is below the Optional section. Selecting it generates a single PDF that combines all of the sponsor forms and the related attachment content. The layout of the PDF will be the same as the NIH reviewers see, and can be printed or circulated via email.
Once OSP submits your Grant Runner application to Grants.gov, you will also see a GR Submission & Status link. Selecting this displays the submission history for your application.
The last link on the menu is Check for Errors. Selecting it opens a pop-up window that displays any errors in your application.
The following image shows an example of the Grant Runner portion of the left navigation menu.

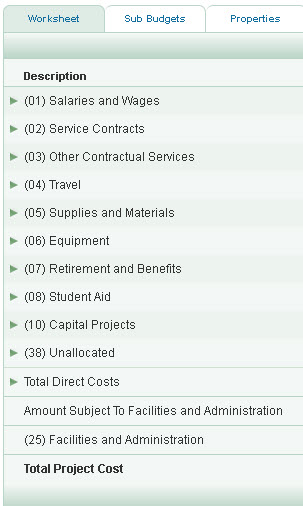
Worksheet Navigation Tabs
The budget worksheet displays line items and period totals for each budget line. The name of the budget and its reference number display above the worksheet navigation tabs.
Tabs
- Worksheet: Displays the Budget Worksheet page
- Sub Budgets: Displays the Sub Budgets page
- Properties: Displays the page with the Budget Properties, Global Attributes and Advanced Settings sections (step 1 of the budget creation wizard)
- Periods: Displays the page with the Periods sections (step 2 of the creation wizard)
- F&A: Displays the page with the Funding Details and F&A Rates and Base sections (step 3 of the creation wizard)
- Assign Access: Displays the page with the Contacts and Access sections (step 4 of the creation wizard)
- Targets & Limits: Displays the page with the Targets & Limits Settings; this tab only appears if you chose this option on the Properties page. It would be step 5 of the creation wizard.
- History: Displays the page with the Budget History; if you linked an eGC1 to the budget, information about it would also appear here.
Worksheet Icons on the Action Bar
At the upper right area of the worksheet is a set of icons. Placing your mouse pointer over an icon will display its function. For full details on each of these icons, see the Worksheet Actions article.
Worksheet Details Overview
Click on any object code summary line to display any existing sub-object line items.
The column entry for one period, for a specific sub-object code line item, shows the total calculated in the item-entry screen(s). The column entry for one period, for an object code summary line, shows the total of all its sub-object code line items for that period. An entry in the “Summary ($)” column (at the far right), for an object code summary line, shows the total of all the periods for that line. At the bottom of the worksheet are column totals for several categories of costs.
In the Salary and Wages section, added personnel will have corresponding entries in the Retirement and Benefits section. Student Aid line items are automatically added when you add an individual to the Salaries and Wages section with a UW sub-object code of: 01-33, 01-34, 01-43, 01-44, 01-51 to 01-54, or 01-91 to 01-94. See Salary and Wages Introduction for more information on how to select individuals.
Worksheet Table Columns
Description column
This lists the budget lines, which are categorized into 11 summary sections, derived from actual UW Object Codes. Click on a summary line to display its sub-object codes, or hide them. The current object codes included are:
- (01) Salaries and Wages
- (02) Service Contracts
- (03) Other Contractual Services
- (04) Travel
- (05) Supplies and Materials
- (06) Equipment
- (07) Retirement and Benefits
- (08) Student Aid
- (10) Capital Projects
- (38) Unallocated
- (19) APL
Note: SAGE Budget does not include all UW Object Codes.
See also: Salary and Wages Introduction and a list of all UW Object Codes.
Target Amount
This line displays only when you have the Targets and Limits feature enabled. It displays the target amount you have established for each period of your budget. This amount is not included in your budget totals.
Target Difference
This line displays only when you have the Targets & Limits feature enabled. The Target Difference is the difference between the target amount you have established for each period of your budget and your budget total. When your budget exceeds the target amount, the target difference displays in red text. When your budget is less than your target amount, the target difference displays in black text.
The Target Difference is not included in your budget totals.
Summary and period columns
The summary column values are the sum of all line items (sub-object codes) set up within the summary line’s section.
Each budget column represents one period. The periods are defined in step 2 of the setup.