Note: You must have the OSP Administrator ASTRA role.
To retrieve the status of the application, first click the Select button to pick the endpoint. The Selected? checkbox to the left switch to checked. You must do this step even if there is only one endpoint.
Next, enter the full Grant Tracking Number, including “GRANT” and click Check Status.
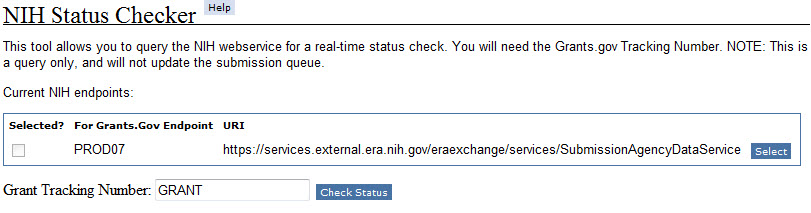
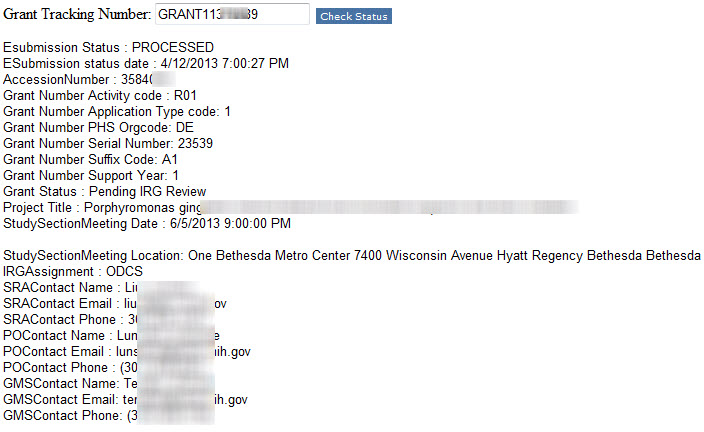
The results of the status check will display.
Note: You will see the same dialog window for both Approvals and Returns. For details on returns, see the Return an Application article.
When you have completed your review of an “In OSP” status application and it is ready for submission to a sponsor, you can change its status to “Approved.”
NOTE: A standard (non-Grant Runner) application can be approved when in Routing status. The approval dialog window will display the warning message “This application has not yet been approved by all associated organizations on campus.” You should not do this unless there are special circumstances.
To approve an application:
- From the left navigation menu of an open application, click Approve/Return.
- Under Application Details, review the summary information to ensure you are processing the correct application.
- Under OSP Notes, add any comments pertaining to this approval. These notes will appear on the History & Comments page.
- From the drop down menu, choose the location of File. You must reassign an application when approving.
- Finally, click Approve.
Once you approve an application, the research team can no longer withdrawn it and OSP cannot return it.
Note: The research team is not automatically notified when you approve an application.
You must attach the application to a cycle when you approve it, if it hasn’t been already. When you click Approve, a new window will display with a choice to create a new cycle or search for an existing cycle to attach the application to.
Any personnel changes made by campus to the PI, Personnel, & Organizations page after the application has been approved will be listed on that page.
For information about campus approvals and compliance reviewers, see the Approvals section.
In SPAERC, you can change the status of an approved application to Awarded, Denied by Sponsor, and Permanently Withdrawn. You may also view the status history.
Change Status to Awarded
When a sponsor notifies OSP of a project award, you can create a funding action as the child of the appropriate application. When you send (or re-send) the funding action to GCA for processing, the application’s status automatically changes to Awarded. The pink banner in the application will now display “Awarded.”
Change Status to Denied by Sponsor
When you receive notification that the sponsor denied funding for a project, you should change the status of the application to “Denied by Sponsor”.
- From the left navigation menu of the open application, click Sponsor Decision.
- Check the information under Application Details to make sure you are processing the correct application.
- Enter comments in the OSP Notes field regarding the status change. When you change the status of an application to Denied by Sponsor, you must enter comments.
- Click Denied By Sponsor.
This process changes the application status from Approved to Denied by Sponsor. The pink banner will change to “Denied By Sponsor.” The system does not automatically change the individual and group/team assignments for the application. You should assign a denied application to File.
Change Status to Permanently Withdrawn
Occasionally, you may need to withdraw an approved application.
- From the left navigation menu of the open application, click Permanently Withdraw.
- Check the information under Application Details to make sure you are processing the correct application.
- Enter comments in the OSP Notes field regarding the status change. When you change the status of an application to Permanently Withdrawn, you must include comments.
- Click Permanently Withdraw.
This process changes the application status from Approved to Permanently Withdrawn. The pink banner changes to “Permanently Withdrawn.” The system does not automatically change the individual and group/team assignments for the application.
To view status history
From the open application, click the Status tab.
Each Funding Action has a status that can change based on manual action by the user. The status reflects where the FA is in the whole grant lifecycle from In OSP to Processed.
A Funding Action may have one of the following statuses:
- In OSP: Initial status for a new FA. OSP staff can edit FAs with this status.
- Approved: When you click the Approve link in the left navigation, the status of an FA changes from In OSP to Approved. An FA must have an Approved parent application and be in a Cycle before you can approve it. OSP staff can still unlock and edit an FA with this status.
- In GCA: When you click the Send to GCA link in the left navigation, the status of an FA changes from Approved to In GCA. An FA must have a status of Approved, and not be on Hold, before you can send it to GCA. OSP staff cannot edit an FA with this status.
- Returned By GCA: An FA has this status when GCA sends it back to OSP to add or correct information. OSP staff can unlock and edit an FA with this status. When GCA returns the item, the system assigns it to the Prepared By person (or to the Failover Team if the person is no longer OSP staff). NOTE: You can personalized your Tasklist to help you identify these returned transactions.
- Re-Sent By OSP: An FA has this status after you edit an FA that has a Returned by GCA status and resend it to GCA. OSP cannot edit an FA with this status.
- Duplicate: An FA has this status when you click the Mark as Duplication link. You must enter the number of the existing FA this FA duplicates to assign this status.
- Denied: An FA has this status when you click the Deny link in the left navigation.
- Processed: An FA has this status after GCA has fully processed the FA and notified campus. OSP cannot edit an FA with this status.
To view status history
If you have any questions about the status of a funding action, you can check its Status Page for the details.
Each application created in SAGE has a status. The status reflects where the application is in the whole grant lifecycle from proposal through to close-out.
An application may have one of the following nine statuses:
- Composing: An application has this status while in development by a Principal Investigator (PI) or a research administrator in SAGE. OSP reviewers cannot see an eGC1 in this status.
- Routing: When a research team completes an application, indicating that it’s ready for review, the application status changes to Routing and it moves into the approval phase. Preparers have the option to “withdraw” the application from routing to make adjustments, and then re-complete it so that it resumes routing.
- In OSP: When all of the business units on campus that need to approve the application have done so, its status changes to In OSP.
- Returned: During the review process, a campus or OSP reviewer may return the application to the research team for changes. When that occurs, the application status changes to Returned.
- Withdrawn: As the application is routing, the research team may need to make changes. They can pull the application out of routing to make it editable. When that occurs, the application status changes to Withdrawn.
- Approved: When OSP has approved an application, and their node on the approval graph is green, the application status changes to Approved. The application will have a pink “Approved” banner on its pages.
- Awarded: If the sponsor awards funding to the proposal, OSP creates a Funding Action and sends it to Grant and Contract Accounting (GCA) for processing. When the system changes the FA to “Sent to GCA,” it also automatically changes the application status from Approved to Awarded.
- Denied by Sponsor: If the sponsor does not fund the proposal, then either the research team or OSP can change its status from Approved to Denied.
- Permanently Withdrawn: If the research team decides not to submit the application to the sponsor, its status should become Permanently Withdrawn. If the application’s status is Withdrawn or Returned, the research team can change it; if its status is In OSP with RTS = Yes or if its status is Approved, then OSP can change the status.
To view status history
If you have any questions about the status of an application, you can check its Status Page for the details.
To reset the status
OSP can use the Reset Status feature to set some statuses to a prior state.