Note: You must have the OSP Administrator ASTRA role.
Use this tool to update the content of Auto Generated Documents (AGD). Note that you cannot add or delete AGDs using this tool.
Start by selecting the document you want to edit by using the drop-down Document menu. Your choices are:
- For Applications
- Application Review
- Application Cover Letter to Sponsor
- For Funding Actions
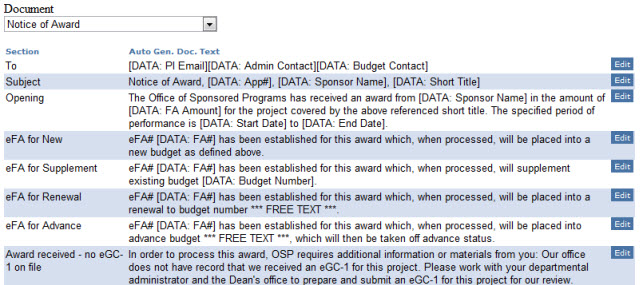
- Notice of Award
- Request for Activation Notice – fellowships
- Research Agreement Acknowledgement
- Sponsor Document Cover Letter
- For Admin Actions
- Request for SFI Extension Information
- Sponsor Document Cover Letter
- For Subawards
- Subcaward Cover Letter
- Subaward Email Notification
- Subaward Notice to NIH

Next, click the “edit” button for the section of text you want to change.
Enter your changes in the Text section. The Document and Section names display as grayed out, as these are not editable.
Note: Be sure not to change any of the text in square brackets, such as [DATA: FA#] or in angle brackets, such as <br> in the Application Sponsor Cover Letter.
Click “Save” to save the changes, or “Cancel” to return to the list.
Note: you must have the OSP System Administrator ASTRA role.
Use this tool to manage the data mapping of a team and Admin/GCC/PC to an organization code. When an application starts routing for approval, the system assigns it to a team and person based primarily on its organization code receiving funding. (For more details, see eGC1 Assignment Rules.)
Manage Users
You can use this section of the tool to
- Add a new user
- Delete a current user and reassign items
- Reassign all of a user’s items to another user
Adding a User
Clicking Add New Spaerc User opens the Personnel Chooser. Use it to search for and select the person you want to add. Once you exit and re-enter the tool, you can choose the newly added person in the various drop-down menus.
Deleting a User
Use the first drop-down menus to select the person you want to delete. Use the second menu to choose the person who you are assigning any outstanding items from the deleted person.
Click Reassign Items, and then OK in the confirmation pop-up, to complete the process.
Reassigning Items
Use this part of the tool to change the assignment of one person’s items to another. Select the appropriate person for the “From” and “To” and then click Reassign Items. Click OK in the confirmation pop-up window to complete the process.
Manage Teams
Use this section to designate members of the teams and assign the team’s org codes.
To display another team, use the drop-down menu to pick the desired Team name. The page will refresh and show the information for that team.
To change the Admin, GCC, or PC for a given group (column), just select a different name from that drop-down menu.
You can only add an unassigned organization code to a group. So you may need to first delete it from its current group. Do this by clicking on the red X to its left, and clicking OK in the confirmation pop-up window. To then add that code to the new group, click Add New Organization. This will open the organization code chooser. Once you’ve selected the code you want, the page will redisplay with the organization code added to that column.
To add a new group (column) to the page, click Add Team “team” Administrator. When you click the button, the personnel chooser will appear. Once you’ve searched for and selected the person you want, the page will redisplay with the new column at the far right. The person you selected will be the Admin, and the system will copy over the GCC and PC from the first (left-most) column.
To remove an existing group, you must first remove any organizations assigned to that group. Once that is done, click on the red X next to the Admin’s name, and OK in the confirmation pop-up window, to complete the process. The page will refresh and the deleted group will no longer display.
List/Edit Sponsors
Use this tool to search for existing sponsors and edit their related information.
Start by entering the string of characters you want to search for, and then select what you what to search by. The choices are:
- All
- Sponsor Name
- Sponsor Parent
- Notes
You can further limit your search by using the Type drop-down menu to select the Sponsor Type, such as Federal Government or Association & Non-Profits.
Finally, you can limit your search by selecting a Status value of Active, or Inactive.
Click the Search button to run the search. The results list will display and include the following columns:
- Name
- Type
- Allows Escalation (True/False)
- URL
- Notes
- Active? (True/False)
- PHS? (True/False)
- Parent Sponsor
To the right of each sponsor listed, Edit and Delete buttons display.
- The Edit button opens a data entry form populated with the current data values. You can change any of the values displayed. Note: You cannot inactivate a sponsor that has active children.
- The Delete button refreshes the page and changes to an Undelete button.
In addition to the Search button, there are 3 other buttons:
- Add New Sponsor: click this to access the Add Sponsors tool described below
- Cancel: [generates a page error]
- Reset: click this to clear the search string and reset each of the drop-downs to the “all” choice.
Add Sponsors
Use this tool to add a new sponsor to the database. Please read through the displayed instructions for adding a sponsor.
The Allows Escalation? checkbox defaults to checked, which indicates this sponsor allows another approver, typically the department chair, to approver for the PI.
Check the Apply PHS FCOI Rules field if the new sponsor is a Public Health Service sponsor.
The three buttons are
- Save: refreshes the page and adds a light green banner with the text “Save was Successful”
- Cancel: returns you to the List Sponsors tool
- Reset: clears any data entered in the form
Note: Use Reset Status to move an Approved application back to In OSP status.
To access the SPAERC administration tools, place your mouse over the Administration tab, and select Spaerc Administration. You will need to use 2FA to log in.
The SPAERC Admin Tools page has two sets of tools.
- Grant Runner Submission Queue Tools: You must have the OSP Administrator ASTRA role to use these tools.
- Editing Tools: You must have the OSP System Administrator ASTRA role for these tools, and the OSP Subcontracts ASTRA role for the Manage Subcontractors (Subrecipients) tool.
Grant Runner Submission Queue Tools
- Grant Runner Submission Queue: Monitor/Manage the Grant Runner submission queue. You can view status history, change status, remove an item from the queue, and initiate real-time queue updates. [editor’s note: full article under construction]
- View Status History: View full status history for a specific Grant Runner application
- Grants.gov Status Checker: Query Grants.gov webservice for a real-time status check (must have the Grant.gov Tracking Number). NOTE: This is a query only. This will not update the submission queue. [editor’s note: full article under construction]
- NIH Status Checker: Query NIH webservice for a real-time status check (need Grant.gov Tracking Number). NOTE: This is a query only. This will not update the submission queue.
Editing Tools